General Assembly WDI, Week 7

What’s “this”? and the promise(d) land.

Days 30-32

The first three days of Week 7 were devoted to our projects: Monday and Tuesday were work days, and Wednesday was for presentations. If you want a blow-by-blow of project two, I wrote up my daily dev log here.

While working on my project, I had an interesting conversation with one of the GA instructors about the API we use for our first project (Tic Tac Toe). I built a feature for my version of the game that gets all of a user’s prior game history when they log in and goes through each game that’s marked as “over” to calculate whether the game was a win, loss, or tie. These stats are tallied and displayed at the bottom of the window, and are updated as the user plays new games.

It doesn’t take a long time to calculate these stats—the logic isn’t terribly complicated, the entire package of data is pretty small, and, seriously, how many games of Tic Tac Toe could one person ever want to play? But I’ve been thinking about how much easier this process would be if, at the end of a game, we could just store the winner (or “tie”) on the server. That would let us avoid re-calculating the winner for each game just to get a stats counter.

After I made my pitch, I got a quick introduction to memoization, which is when you store data that takes some time to calculate on a server, so you can retrieve it rather than recalculating it each time. The key point we covered: memoization without validation can be dangerous. It would be easy to mark a player as the winner without the game being over and/or without that player having won. Also, for Tic Tac Toe, it’s not really a big issue, as it’s not that computationally expensive to re-tally the stats each time (it’s also, as was pointed out to me, a good exercise for us). Another point: memoization involves a tradeoff between time (to recalculate) and space (to store extra data on the server). Lastly: this is still a bit above my paygrade as someone relatively new to the field. But it’s cool to be thinking about!

Another couple of things that came up during project presentations that I want to remember:

  • A handful of people recommended Bootsnipp for examples of good uses of Bootstrap for specific UI elements (things like testimonials or five-star ratings).
  • One person made the best wireframes using Balsamiq. I experimented with creating my wireframes in LucidChart, since I had already sketched out my data relationship model there, but I ended up drawing them by hand, which was faster and easier. But those Balsamiq wireframes…they were gorgeous.
  • It’s a bad idea, optimization-wise, to include an entire font in your project if you’re only going to use a couple of characters (for a logo or an icon, for example). It slows down load times, especially on mobile; it’s better to make a .png of what you need and use that instead. Guilty as charged—going to try to do better next time.

Day 33

After a quick review of distributed git workflows (our next project is a group project), we jumped back into JavaScript to talk about this.

It’s notoriously difficult to understand.

Though I think (hope) I’m starting to get a better handle on it. We talked about the “four patterns of invocation” (described by Douglas Crockford in JavaScript: The Good Parts):

  1. Function Invocation Pattern: If you call a function in the global namespace, this refers to the global object. In the browser, this is the window; in Node, you’ll get the node object. Note that this is not true if you’re using 'use strict'—strict mode disables this from pointing to the global object; instead, it points to undefined.
  2. Method Invocation Pattern: If you call a function on an object (dog.bark()), this refers to the “host object” (the object on which you called the method). Inside of bark(), this will be dog.
  3. Call/Apply Invocation Pattern: You can use .call() and .apply() to pass an object to a function and use that object as this. If dog.bark() uses this.name to return "George is barking", dog.bark.call(giraffe) would return "Geoffrey is barking" (assuming your giraffe is named Geoffrey). .call() and .apply() have the same result; the difference is in the signature (.call() takes a list of args; .apply() takes the object and then an array of args). Mnemonic (from CodePlanet): “Call is for comma (separated list) and Apply is for Array.”
  4. Constructor Invocation Pattern: If you create a new object with a constructor function by invoking that function with new (new Dog), then this (when using the methods that exist on that constructor’s prototype on that new object) will refer to that new object.

Here’s where my understanding gets a bit fuzzy—I’d like to review these two points a few more times:

  • You can attach .bind() to a function to create a new “bound” function that uses the object you pass to .bind() as its this. So let giraffeBark = dog.bark.bind(giraffe) will mean that calling giraffeBark() returns "Geoffrey is barking".
  • Why is this complicated? When we pass a callback function, we’re not executing that callback. The callback function is run when the function that calls the callback is run. The execution environment is not always what you would expect, which is why this can change.

Day 34

On Friday, we started exploring Node. We’d used the node repl before to experiment with JavaScript from the command line and run simple scripts, but we hadn’t covered much more beyond “okay, now type node into your command line. Okay, you’re good to go!”

We started with a quick overview of the difference between working in Node and working in the browser: both are JavaScript runtime environments. Browsers include APIs for interacting with the DOM; Node includes APIs for interacting with the server and the file system.

From there, we started using the Node file system methods to read from and write to files. We were working with a script that takes two optional command line arguments: the file to read, and the file to write. If the write file isn’t provided, the script writes to /dev/stdout, which was initially described to us as “the terminal/console.log() in node.” If a dash (code>-) is given instead of a file to read, the script reads from stdin. Time for me to have a Capital M Moment with the command line. I kept running variations on this script, like so:

  • node lib/copy-file.js data/infile.txt outfile.txt This works as expected: the contents of data/infile.txt get copied to outfile.txt)
  • node lib/copy-file.js data/infile.txt Again, as expected: the contents of data/infile.txt get written to the console (in Node, the Terminal)
  • node lib/copy-file.js - outfile.txt This is where things got confusing. The dash means I want to read from stdin, which I currently understand as “the Terminal,” which I process as “the command line.” But…where, exactly? I try this:
    • node lib/copy-file.js - outfile.txt And get nothing—as in, I have to forcibly exit out of node because it’s waiting for an argument it’s never going to get.
    • node lib/copy-file.js - outfile.txt data/infile.txt Same thing. In this case, “data/infile.txt” is the fifth command line argument, which the script isn’t looking for/expecting.
    • data/infile.txt node lib/copy-file.js - outfile.txt An error from bash this time: -bash: data/names.txt: Permission denied

At this point, I can’t think of any other permutations, so I raise my hand and ask for clarification and am reminded about pipes, which are used to pass the output of one command to another command as input.

I try data/infile.txt | node lib/copy-file.js - outfile.txt and get another error from bash (this time with more detail):

-bash: data/names.txt: Permission denied
SyntaxError: Unexpected end of input
    at Object.parse (native)
    at /Users/Rebekah/wdi/trainings/node-api/lib/copy-json.js:44:17
    at FSReqWrap.readFileAfterClose [as oncomplete] (fs.js:380:3)

I’m told I have to use cat to read the the contents of data/infile.txt: cat data/infile.txt | node lib/copy-file.js - outfile.txt. It works!

And I am SO CONFUSED.

Confused

I know that cat reads files. But I ALSO know that our script takes a file path—not the contents of that file—and then uses node’s fs module to read that file. From where I’m sitting, it looks like we’re reading the file twice.

(Are you ready? Here’s where the Moment happens.)

I’m confused because I don’t understand stdin/stdout. I’m still thinking of them as “the command line” or “the Terminal.” My mental image of what happens when I run cat data/infile.txt | node lib/copy-file.js - outfile.txt is that it’s the same as running node lib/copy-file.js "all the contents of data/infile.txt" outfile.txt.

Wrong.

I was so very wrong.

(I’m obviously still learning this, so guidance on this particularly is welcome in the comments, and I’ll do my best to update with any corrections.)

Stdin is a file handler or a stream, not a floating, headless mass of whatever you gave it. When I type cat data/infile.txt, I’m reading the contents of data/infile.txt into stdout, which the | then picks up and uses as stdin. I’m not sending the contents of data/infile.txt—to my script as the infile argument. It helped me to think about it as copying data/infile.txt to a new pseudo-file called stdout (and then to stdin), and giving “stdin” to my script instead of “data/infile.txt.” The script can then read the contents of stdin in the same way it can read the contents of data/infile.txt.

(This has been A Moment with Bash.)

None of that was actually the point of the lesson, which was to teach us that Node (unlike plain old JS or jQuery) can interact with the file system, which is pretty cool. It also served as a segue for learning about callback hell and Promises, which we talked about after a quick detour:

After a round of applause, we spent some time talking about what we should take away from this article. My own favorite response is this one:

But we also talked about the importance of getting the job done and of learning how to focus your energy (and on what). Someone also made the point that the PB&J dude has clearly never been in a grocery store before, and a huge part of GA is, effectively, taking us on lots and lots of trips to the grocery store—we might not know every botanical detail about the tomato, but we know that you don’t need a tomato to make a PB&J, so we’re already, like, eight steps ahead of this guy.

(Lost? It’s worth reading the article, and also the original article about learning JS in 2016. I also really like this response from Addy Osmani: “first do it, then do it right, then do it better.”)

Entering the Promised Land

On to promises. When ES6 came out, I remember reading an article on Medium about promises as part of a larger effort to educate myself about JavaScript, generally speaking. At the time, it was over my head—it was one of those articles that you struggle through because you don’t know what most of the code means and can’t yet conceive of a useful situation for this particular feature.

I’m not sure I’m *that* much clearer on Promises now, but I’m getting closer. Here’s my key takeaway so far:

Promises get you out of callback hell: they help you organize asynchronous code in a more linear way, so it’s easier to read and understand.

The rest is mostly details:

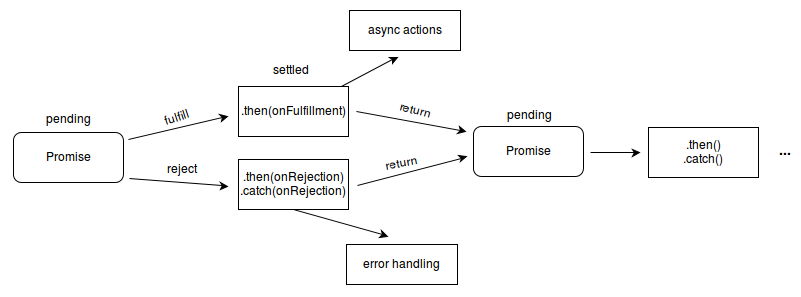
  • Promises can be pending or settled. Settled promises can be fulfilled or rejected.
  • Promises can only settle once. When they are settled, they are either fulfilled or rejected, but they can’t switch or resettle.
  • When you write a promise, the promise’s “executor” takes two functions as arguments: resolve and reject. The executor usually does something asynchronous (read a file, for example), then, when that work is finished, calls either resolve (if it’s successful) or reject (if there’s an error). resolve fulfills the promise and passes whatever data you give it to .then, which takes a callback that executes with that data. reject rejects the promise and passes the error you give it to .catch, which takes a callback that executes with that error.
  • Both .then and .catch return promises, so you can keep chaining .thens and .catches together.

I found this diagram, from the MDN docs on Promise, helpful:

Chained promises

We spent some time “promisifying” scripts that used callbacks, focusing specifically creating “wrapping functions” in Node to use promises instead of callbacks. The emphasis was on avoiding these common mistakes:

  • Not returning something from .then (unless the .then statement its the last thing in the chain). If you mess this up, data won’t continue to propagate down the chain.
  • Not calling resolve and reject in the executor somewhere.
  • Not handling errors (if you don’t, your promise will fail silently).
  • Executing a callback (i.e., .this(doStuff(data)).this(doStuff)).
  • Treating AJAX like a promise. $.ajax() is not a promise.
  • $.ajax() returns a jqXHR object, not a promise.

As we work more with Node, it sounds like promises are going to be a Big Deal. At the end of last week, they didn’t feel intuitive, but after our homework over the weekend and class yesterday and today, I’m starting to feel a bit better about them. Onward!

General Assembly WDI, Week 6

AUTOMATED TESTING IS MY FAVORITE.

Day 25

I wrote a lot of SQL scripts today, mostly focused on joins. A few things I learned:

  • You have to use double quotes around names for things (databases, tables, columns) within SQL, but single quotes around strings. Mnemonic: “[S]ingle quote for [S]trings, [D]ouble quote for things in the [D]atabase.” The command line doesn’t care about quotes, so you don’t need to be as specific in psql commands.
  • A new convention for naming join tables: use semantic names, e.g., “loans” for a join table between books and borrowers or “amounts” for ingredients and recipes (assuming you’re specifying things like “1 cup of flour” in that table). This is a change from how I’ve previously done things, where I’ve used the combined names of the two tables, in alphabetical order, separated by an underscore (“books_borrowers” or “ingredients_recipes”).
  • Objects in a database are not just tables. Objects can also be sequences or indices (and maybe other things I don’t know yet).
  • VARCHAR is part of SQL standard; TEXT is not. But Postgres gives us TEXT, which is “efficient/optimized”—I think this means efficient in terms of being easier to write when you’re coding, but I’m not sure.
  • \i in psql reads a script file into buffer and sends it to database server. Rails migrations also do this: they generate SQL commands based on code in migration.
  • psql offers basic logic capabilities You can use bash loops to batch execute psql scripts (thanks for the correction, Jeff!): for i in scripts/cookbook/*; do psql -f $i sql-crud; done
  • UNION in SQL will joins select statements together.
  • A foreign key reference is a constraint: limits what can happen; disallows certain actions.
  • SQL doesn’t execute in order: either the whole statement is valid & executes, or nothing executes. This lets you define things (like aliases) after you use them. The parser parses the entire statement & figures out the details for you.

Not relevant to SQL necessarily, but cool: typing cal into the command line will give you a monthly calendar.

We also talked about how to implement many-to-many relationships in Rails. Scaffolding or creating migrations will set up *part* of the relationship, but you still have to edit your models to specify has_many or has_many through relationships. You also have to add inverse_of in a join table, telling the join table to be the inverse of itself. This sparked significant confusion in the class, and I’m still not clear on what this is, how it works, and why/where it’s needed.

Day 26

We continued working with data relationships in Rails.

Serving Custom JSON From Your Rails API With ActiveModel::Serializers” made serializers “click” for me, particularly with respect to using data relationships (rather than just listing all attributes out) to leverage serializers for other models. Super cool!

We also talked briefly about protecting resources in our Rails API by having our controllers inherit from the ProtectedController class, rather than the ApplicationController. Not clear whether this is a standard feature in Rails, or something that GA built for us.

Behavior-Driven Development (BDD)

This unit was one of my favorites so far: behavior-driven development using RSpec. The approach we took was:

  1. Write a user story/define a user behavior.
  2. Write a feature test that targets this behavior.
  3. Run the feature test. Watch it fail.
  4. Write a unit test.
  5. Run the unit test. Watch it fail.
  6. Write code to satisfy the unit test.
  7. Run the unit test. Watch it pass.
  8. Go back to steps 3-7 and repeat until your feature test passes.
  9. Commit your code.

Day 27

We kept rolling with BDD today. We talked about four-phase testing: (not all four steps happen for each test)

  1. setup (a lot of this happens in before(:all) and before(:each); also parsing JSON, etc.)
  2. act/exercise (actually execute the code the test is acting upon, e.g., Article.create)
  3. assert (expector should)
  4. teardown (after(:all))

My feelings about TDD/BDD can be described as:

So excited

I understand why we learned about Rails before we learned about RSpec, but I’m sad that I got a head start on my second project and set up all of my resources and THEN learned about automated testing. I’m hoping to be able to use BDD/TDD for another project, but in the meantime, I’m trying to go back and write automated tests for the code I’ve already written. More on this when I write up my project (soon, I hope!).

A few more things about testing and RSpec and Rails:

  • Rspec uses TEST (not DEVELOPMENT) environment (test database, not dev database).
  • Code within feature tests will by nature replicate code within unit tests. Feature tests are “black box” tests; they “don’t exist within Rails.” Unit tests (controllers, models, routing) exist within Rails and have access to things. Feature tests are like curl requests. Feature tests spin up a server—this takes a long time/is expensive. (This was a quick explanation to a question I asked about why we’re replicating so many lines of code between our feature tests and unit tests—why can’t we just call a unit test we’ve already defined from within a feature test? I need to come back to this; I still don’t fully understand the separation/redundancy here.)
  • All hashes that come through Rails are called “hashes with indifferent access” and will work with symbols or strings. JSON.parse returns a Ruby hash, meaning we can’t use symbols to access attributes.
  • Use more specific, less semantic tests in unit tests (and more semantic, “friendly” language in feature tests). Example: .to be_successful in feature test vs .to eq(200) in unit test.

Handlebars

We took a very quick spin through Handlebars, a rendering library (templating engine) for JavaScript. For me, this filled in some of the gaps we left by not using views in Rails/using Rails only as an API. We’re using handlebars-loader to load/process Handlebars files for us.

Days 28-29

Thus began project 2. I’m planning to write this up in a separate post, so that wraps things up for this week!

Braving Bash, Part 2

Diving into ~/.bash_profile.

In Part 1, I talk about facing my fears of potential machine ruin and beginning to figure out what, exactly, is happening in my bash init files. At the end of that post, I had just figured out that three lines of code in my ~/.bash_profile file were checking to see if I had a ~/.bashrc file, and executing it if so. Now that I know that, I can start digging into what this code actually does. Since I’m already hanging out in ~/.bash_profile, might as well start there.

Step Three: Take apart .bash_profile

Line 1

export PATH=/usr/local/bin:$PATH

PATH is something that comes up a LOT when you’re setting up different coding-related tools. I knew it had something to do with finding the right versions of executable code (including programming languages like Ruby or PHP). The Wikipedia article on $PATH explains: “When a command name is specified by the user or an exec call is made from a program, the system searches through $PATH, examining each directory from left to right in the list, looking for a filename that matches the command name.” Adding specific paths to your $PATH variable makes sure you’re using the versions of code that you want to be using.

Old Unix machines originally looked in /bin for executable files. Later versions of Unix added /usr/bin (and then /usr/local/bin) because /bin grew too large to be efficient.

Looking at the line above one piece at a time: as far as I can tell, export makes the variable you’re exporting (in this case, PATH) available to the current environment, including any subprocesses (see this Stack Exchange post) and the “Environment” section of the GNU Bash Reference Manual.1

Moving on: we’re setting PATH (the variable) to /usr/local/bin:$PATH. It looks like paths within PATH are separated by colons. $PATH echoes out the current value of PATH. To sum up: we’re adding /usr/local/bin to the beginning of the PATH variable.

Sweet. Now we know what this is doing!

Next question: why?

Wikipedia says the default PATH includes /usr/bin and /usr/local/bin. So why add /usr/local/bin again?2

I don’t know the answer for this right now, so I’m going to move on.

Line 2

test -f ~/.bashrc && source ~/.bashrc

This looks suspiciously similar to lines 6-8, which I talk about in Part 1.

test is a builtin Bash command that “tests file types and compares strings.” In Part 1, I learned the -f flag returns true if the file exists and is a “regular” file, i.e., not a directory or a file that’s actually a physical device like (I think?) a USB key or an external hard drive. && is a way of chaining commands together where the second command executes if the first command returns true. From the googling I did last time, I know source ~/.bashrc looks for the ~/.bashrc file and executes it.

To sum up: this is doing the exact same thing as lines 6-8. Fun fact: that welcome message that was showing up twice every time I opened a new tab in Terminal? THIS IS WHY. Leaving this line in and removing lines 6-8 solved that problem.3

Success!

Line 4

export PATH=$PATH:/Applications/Sublime\ Text.app/Contents/SharedSupport/bin

Adding more things to my PATH! This one adds the path to my copy of Sublime Text, which is the text editor I for anything where I’m looking at more than a single file at once. Adding it to my path enables me to use the subl command line tool. I don’t know if this is in the right place,4 but I know that temporarily commenting it out makes attempting to run subl in Terminal give me a “command not found” error, so for now, it’s staying.

Line 10

eval "$(rbenv init -)"

Last line! According to this Stack Overflow post, eval takes a string and evaluates it as if you’d typed it into the command line. Wrapping something in $(…) runs it in a subshell (see 1 again).

That leaves us with rbenv init -. rbenv is a Ruby version management tool that we’re using as part of General Assembly. I installed this as part of our “Installfest,” a day where we type a bunch of commands into Terminal and paste a bunch of code into our bash init files, and I haven’t done any research on how it works. According to the docs, it uses a trick in the PATH variable that lets us specify, at a project-by-project level, a specific version of Ruby to use rather than always using the default version on our system.5

The docs also talk about rbenv init. That section starts with “Skip this section unless you must know what every line in your shell profile is doing,” which means I’m definitely going to read it for the purposes of this adventure. My understanding is that rbenv init: 1) makes the PATH magic happen by adding ~/.rbenv/shims to the beginning of my PATH (which I think only needs to happen/only happens once?); 2) “installs autocompletion” (for what? no idea6); 3) rehashes the shims (makes sure that rbenv knows where different Ruby versions are and can direct commands like rake and pry appropriately); and 4) gives rbenv the power to “change variables in your current shell.” Back to my question about shells.1

At the end of the docs, they say “Run rbenv init - for yourself to see exactly what happens under the hood.” This is the output:

~ $ rbenv init –
export PATH=”/usr/local/var/rbenv/shims:${PATH}”
export RBENV_SHELL=bash
source ‘/usr/local/Cellar/rbenv/1.0.0/libexec/../completions/rbenv.bash’
command rbenv rehash 2>/dev/null
rbenv() {
local command
command=”$1″
if [ “$#” -gt 0 ]; then
shift
fi  case “$command” in
rehash|shell)
eval “$(rbenv “sh-$command” “$@”)”;;
*)
command rbenv “$command” “$@”;;
esac
}

Right. As far as I can tell, this is updating my PATH, setting the RBENV_SHELL to bash, then running whatever exists at /usr/local/Cellar/rbenv/1.0.0/libexec/../completions/rbenv.bash. The rest is doing the rehashing bit, I gather—I’ll dig more deeply into this another day, I think. Okay!

Side note: this line used to be in my ~/.bashrc file. I was having trouble getting my Ruby linter to work in Sublime, and then I found out that it needs to be in ~/.bash_profile (long PDF; the relevant part is on page 49 of the file/page 43 according to the printed page numbers). I moved it, and rubocop is working again, so I’m happy with that for now.

Wrapping Up

Whew
Okay! That’s one file down. I deleted three lines and got rid of that pesky repeated welcome message, so that’s good. I also have a ton of questions (do you know about these things? are you willing to help out a well-intentioned and somewhat confused newbie?).

A friend commented on my last post to recommend, among other things, an O’Reilly book on learning the bash shell. (Huge thanks to him and to everyone else who’s given advice/helped answer questions so far!) Since then, I’ve heard from several other people that getting comfortable with the command line is one of the best things I can do to make myself a better, more fluent engineer. That advice plus this process plus the recent Twitter kerfluffle around this HackerNoon article about JavaScript tool/framework proliferation (and in particular, this excellent thread by Safia Abdalla about what things are actually important for engineers to learn)—all of this has reinforced my desire to be able to be willing to open up the hood, ask questions, and understand what’s going on behind the code/scenes.

I’m mixing my metaphors, but the point is: I’m having fun, and I can’t wait to write up what I’ve learned about my ~/.bashrc file in Part 3, coming soon!

Notes and Questions

Do you know the answer to any of these? Are you willing to share? Please do! Comments/emails/tweets all welcome!

1. Still not 100% clear on when to use/not to use export, or what “subprocesses” and “subshells” mean in this context. When I open Terminal on my Mac, I think that I’m entering (running? using?) the bash shell. From there, I’m not sure what a subshell would be. A subprocess could potentially be something within my shell, like irb or pry or node.

2. I’m using a 2010 MacBook Pro, running OS 10.11.6 (El Capitan). Do I need this line, and if so, is it in the right place? Relatedly: is there a way to find out what the “default” PATH is, sans any changes made by the user in any of their bash init files? Predictably, echoing out my entire PATH gives me a giant mess (removed the colons and separated this into lines for better readability):

3. Does anyone know what the exact differences between line 2 and lines 6-8 are, other than syntax, if any? I chose to leave in the shortest/most compact version (test), but I’d be curious to know if there’s a best practice or preferred standard around when to use test vs if statements.

4. While we’re on best practices: is there a best practice for where to put any necessary export PATH statements, and/or in what order?

5. Corrections/clarifications here welcome!

6. What does rbenv autocompletion do? What does it autocomplete?

Resources

Braving Bash, Part 1

In which I face my fears and finally decide to learn what’s happening in ~/.bash_profile and ~/.bashrc.

At some point in early grade school, after I had exhausted my Jetpack attention span and my ideas for Hypercard-based animated art, I decided I would explore all of the settings I could find on my parents’ Macintosh SE. I was feeling very knowledgable, right up until the moment I stumbled onto the Sad Mac:

Sad Mac

Cue panic.

My dad assures me “the sad Mac was way more common in those days—the MacOS was easier to break,” but even so: since then, I’ve been a bit squeamish about messing around under the hood of my computers.

And then I decided to learn how to code, which—once you make it past online tutorials like Code Academy and Free Code Camp—almost always starts, in my experience, with being told to run a bunch of commands in Terminal and/or paste a bunch of code into your ~/.bash_profile and/or ~/.bashrc files. If you’re lucky, these instructions come with explanations, but often, you have to take it on faith.

I’ve done my best to ignore the creeping feelings of unease and the shades of decades-old Sad Mac panic for several years, dutifully following the instructions and watching these files grow more and more bloated.

When I started at GA, we were given around 20 lines of code to paste into the two files. The next time I opened up Terminal, I saw this:

Last login: Tue Sep 27 11:39:11 on ttys003
You have new mail.
[1;90m
—————————-
Loaded ~/.bashrcTo edit run $ bashedit
To refresh run $ bashrefresh

You are: Rebekah
You’re in: /Users/Rebekah

All aliases…$ alias
—————————-
[1;90m
—————————-
Loaded ~/.bashrc

To edit run $ bashedit
To refresh run $ bashrefresh

You are: Rebekah
You’re in: /Users/Rebekah

All aliases…$ alias
—————————-
~ $

That’s not a copy and paste error: I was getting TWO COPIES of a welcome message I didn’t remember setting but had mostly ignored for several years because everything else seemed to function well enough.

Two copies. Of a message I can’t remember asking for. That starts with 1;90m, which, for all I knew, could be CRITICALLY IMPORTANT SUPER SEKRIT BASH CODE or, you know, a typo.

That's enough!

It was time to fix this.

Step One: Actually look at the code

My approach to all things bash-related for as long as I can remember has been to open up the file(s) using nano, paste in whatever I’m told to paste in wherever I’m told to paste it (usually at the very top or very bottom), save, and close out as quickly as possibly to avoid breaking things.

Pro tip: this is not a good way to understand how things work.

This time, I copied the contents of each file to a separate file so I could “safely” open them up, annotate them, and experiment without—I hoped—bricking my laptop.*

Here’s my ~/.bashrc:

And here’s my ~/.bash_profile:

WAT

Step Two: Ask questions

Now that I had code to look at, I could start googling.

First up: what’s the difference between these two files? Stack Exchange says:

.bash_profile is executed for login shells, while .bashrc is executed for interactive non-login shells.

When you login (type username and password) via console, either sitting at the machine, or remotely via ssh: .bash_profile is executed to configure your shell before the initial command prompt.

But, if you’ve already logged into your machine and open a new terminal window (xterm) then .bashrc is executed before the window command prompt. .bashrc is also run when you start a new bash instance by typing /bin/bash in a terminal.

Cool. I log into my machine every time I restart it or wake it up, and I started this whole journey because of what I was seeing when I opened a new Terminal window. Sounds like I should be looking at .bashrc then. Oh, but wait—there’s more:

if you add the following to your .bash_profile, you can then move everything into your .bashrc file so as to consolidate everything into one place instead of two:

if [ -f $HOME/.bashrc ]; then
  source $HOME/.bashrc
fi

Interesting. I have something pretty similar in lines 6-8 of my .bash_profile:

It’s the same code, minus the $HOME part of the file path. Some more googling leads me to The Linux Documentation Project’s Bash Guide for Beginners, which tells me that -f will be “True if FILE exists and is a regular file.” source means run the code in the file.

To sum up: if a .bashrc file exists in the $HOME directory (in my own .bash_profile, this is written as ~/.bashrc, which means the same thing), then run all of the code it contains.

Okay! Now we’re getting somewhere, sort of: I know that I have two files, and I know that, given how they’re currently set up, they’re both executing when I open a window in Terminal.

Next up

In Part 2: what is all that executable code doing?

Notes and questions

* Is this a thing that’s even possible to do from ~/.bash_profile? It’s been a fear of mine for years. If you know the answer (or can share a good resource), please let me know.

Resources

The Linux Documentation Project’s Bash Guide for Beginners, by Machtelt Garrels