General Assembly WDI, Week 12

Capstone project!

end of an era

Week 12 was strange for many reasons: it was the final week. It was a short week—we had Friday off because of Veteran’s Day. Tuesday was Election Day, which….

It was also our final project week, which meant I spent most of the week sequestered in one of GA’s shiny and tiny new conference rooms with coffee and Ember and Rails. Using Ember for our final projects was optional, but I jumped on the chance because a) client side routing; b) I wanted the practice; and c) it sounded fun.

Regarding that last point:

I chose to use Rails for the backend (instead of Node/Express) because it’s a fairly natural pairing and because we had roughly a week to build the project, and I’m more comfortable with Rails than Express at this point.

It’s been two months exactly since I presented my project—sorry for anyone waiting with bated breath to read about my final week at GA—so in the interest of finally getting a post up, instead of doing a detailed blow-by-blow of that week, I’m going to cover the highlights. If there’s anything that piques your interest, leave a comment or get in touch via Twitter/etc., and I’m happy to expound!

Project Planning

When I first seriously starting learning JavaScript, beyond copying & pasting random code to hide and show things on web pages when I was a kid, I started playing around with the idea of building a tool that would generate a random pattern for a quilt, made out of squares and triangles of different colors. This was inspired by the desire to build something super visual, by Libs Elliott’s stunning and unbelievably cool work to generate much better/more intricate patterns with Processing, and by my own interest in quilting.

My first attempt at building this resulted in 335 lines of JavaScript in a single file, nearly 200 of which were inside of a single onclick event. Also: when I abandoned it in November 2015, it didn’t work, and my commit messages were shoddy enough/my use of branching nonexistent such that I couldn’t remember when it last worked and what I had done to break it.

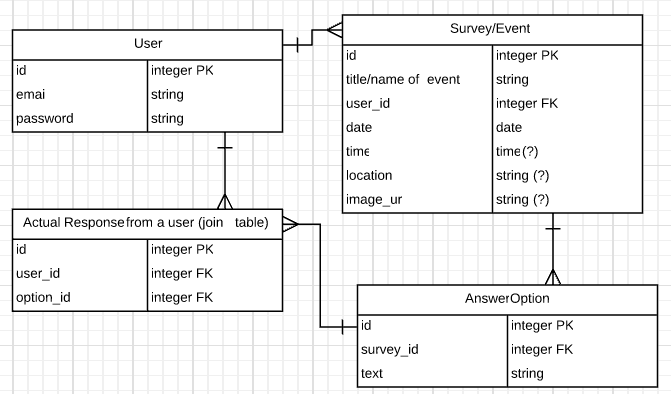
I decided to take this opportunity to revisit the idea and expand upon it, adding the ability to register, to save/favorite different patterns, and to create “projects” associated with specific patterns that would let users write up notes on actually making the pattern into a quilt and photos of the process/the finished quilt.

Prework: File Uploads with Paperclip and Rails

I started by working on photo uploads: we had briefly covered how use Multer/Express/AWS S3 to upload photos and store URLs to a database, but I needed to apply this knowledge to a Rails API and to Ember. I knew I would need to re-scope my project idea if I couldn’t get uploads to work, so given the tight project timeline, I decided to focus on this first, give it a day or so, and move on if I hit too many roadblocks.

I set up the API and scaffolded a very basic “pattern” resource—at this point, I was thinking that I would need to store the generated pattern as an image (I’ll come back to this later). Following along with a General Assembly repository on using Paperclip that’s a couple of years old/out of date, and is no longer being taught by GA Boston, I installed Paperclip and ImageMagick to help with uploads through Rails, then wrote a curl script to test whether I could POST image data to the API without yet storing it in S3. I had to write a slightly different script than the ones I had been using to send JSON data through POST requests; this Stack Overflow post on data types helped.

I installed the aws-sdk gem, which Paperclip uses to store files on S3, and added the necessary AWS config variables (s3 region, bucket, access key ID, and secret access key) to my .env file so that I could use them in my config files. From there, I used curl to test the upload process and make sure that files were being successfully stored in S3 and the URL saved in my database.

Success! I wrote up my process as an issue on the GA Paperclip repo for a few other students who were hoping to do the same thing in their projects, then moved on to working with Ember.

This was…frustrating. After spinning up a very basic Ember project using the Ember CLI, I tried multiple different plugins/components/guides, including ember-data-paperclip, ember-cli-form-data. In the end, I just wrote a basic HTML form, set the enctype to multipart/form-data, and used JavaScript to get the form data by the form’s ID instead of trying to use any Ember fanciness (though apparently using event.target instead of the ID is a better approach?). I also wrote a short custom upload service to send the AJAX request in the correct format.

This took two afternoons, mostly working solo/Googling like mad, but also checking in with one of the GA instructors, who was also attempting to crack this challenge. (Not at all #humblebrag: proud to say I solved it first!) This was one of my first real moments going “off script” at GA, and it was frustrating and awesome and confusing and wonderful. It’s one thing to take a lesson with step-by-step instructions and well-documented code and apply it to your own very similar project; it’s another thing entirely to take snippets of tutorials and gem/plugin docs and a rough sense of what you want to do and make it work. I know this problem isn’t a gigantic one—many, many people have successfully solved it, and I’m sure there are much better, cleaner ways of approaching it than the one I ultimately took—but it was cool to find my own way through the fog.

Resources in Ember & Rails

Saturday afternoon was spent on Ember: integrating authentication and generating some basic routes/models/components. In the process, I switched from using a simple join table and has_and_belongs_to_many to connect Users and Patterns to building a Favorites resource and connecting Users and Patterns using has_many :through—this was prompted by a question I raised about how to do a post to this join table without having a separate, named resource; a good list of the arguments in favor of has_many :through is in the response here.

While working to get data transfer happening smoothly between Ember and Rails, I ran into some confusion around serialized data for many-to-many relationships. This was solved by tweaking my models in Rails; Ember likes to receive IDs (instead of full JSON records) for associated data (details on how to do this are in this issue).

Quilt Pattern Generation

By Saturday evening, I was ready to start tackling pattern generation. I decided to use the (aptly, if coincidentally, named) Fabric.js library to help with this because it makes exporting data from an HTML5 canvas in different formats super easy. Fabric is so fun to work with!

I also got the chance to write another, more detailed custom service in Ember to handle the pattern generation. There are a number of ways in which I’d like to continue refining this, including streamlining the code that draws each individual quilt block (a square or one of four different triangles), adding a way to calculate the total fabric yardage needed for a quilt based on the final number of blocks of each size and color, and letting users choose their own color schemes. That said, this was an amazing opportunity to revisit old code I’d written and figure out how to make it better. I cut the size of the file roughly in half, with the longest method around 50 lines (STILL VERY LONG, but definitely not 200!).

In the process, I also realized that I don’t need to upload anything to S3 for patterns—no need to store these as images; I can just store them as SVG strings which are smaller, load faster, and are easier to scale for different screens and views. Hooray! (Also: I feel like I’ve come a long way with SVG.)

Ember (Days 54-56)

One of our instructors warned us that working with Ember would be an emotional rollercoaster, and HOO BOY was that true. I cycled back and forth between “I LOVE THIS” and “I HATE THIS” more times than I can count. Two months later, I think this was largely because I was trying to do a bit more than was reasonable within my time frame, I was basing my project off an Ember repo that was given to us that had auth built in (which was nice) but also a pretty intense pre-set template of nested components/styling choices that I had to figure out how to dismantle to get what I wanted out of the project (which is still not 100% mobile responsive, which irks me but not enough that I’ve gotten around to fixing it), and, to be honest, because it was election week. Wednesday was a rough day.

I don’t have a ton to report here, which I realize makes for a less than brilliant blog post, but I will leave a couple of notes/thoughts here:

An issue I wrote on how to write a component that does the same action in multiple different parts of the app without repeating that action’s code in multiple different Ember routes. The advice I got was to inject the Ember store into the component, which allows the action to happen at the component level instead of passing it up to multiple different routes to happen there. This is unconventional at best (and some might say a terrible idea), but was an interesting way of getting rid of a ton of redundant code.

GA provides guidance on how to deploy our projects to the web using Heroku (for our Rails APIs) and GitHub Pages (for our client side code). The deployment instructions were oftentimes a bit shaky—I suspect this is the product of having so many different cohorts and instructors and of rapidly changing technology. I ended up writing a condensed, shorthand version of the Rails & Ember deployment guides for my own use that addressed some of the errors/missing information in the existing guides, and then shared it with enough friends that I ended up posting it as an issue for everyone in the cohort.

Lastly: huge thanks goes to my mom, who took the time to beta test Quiltr and actually made a quilt based on one of the patterns I generated, which is featured on the app’s home page. This made my presentation at least 10x cooler than it would have been otherwise.

Quiltr

Quiltr

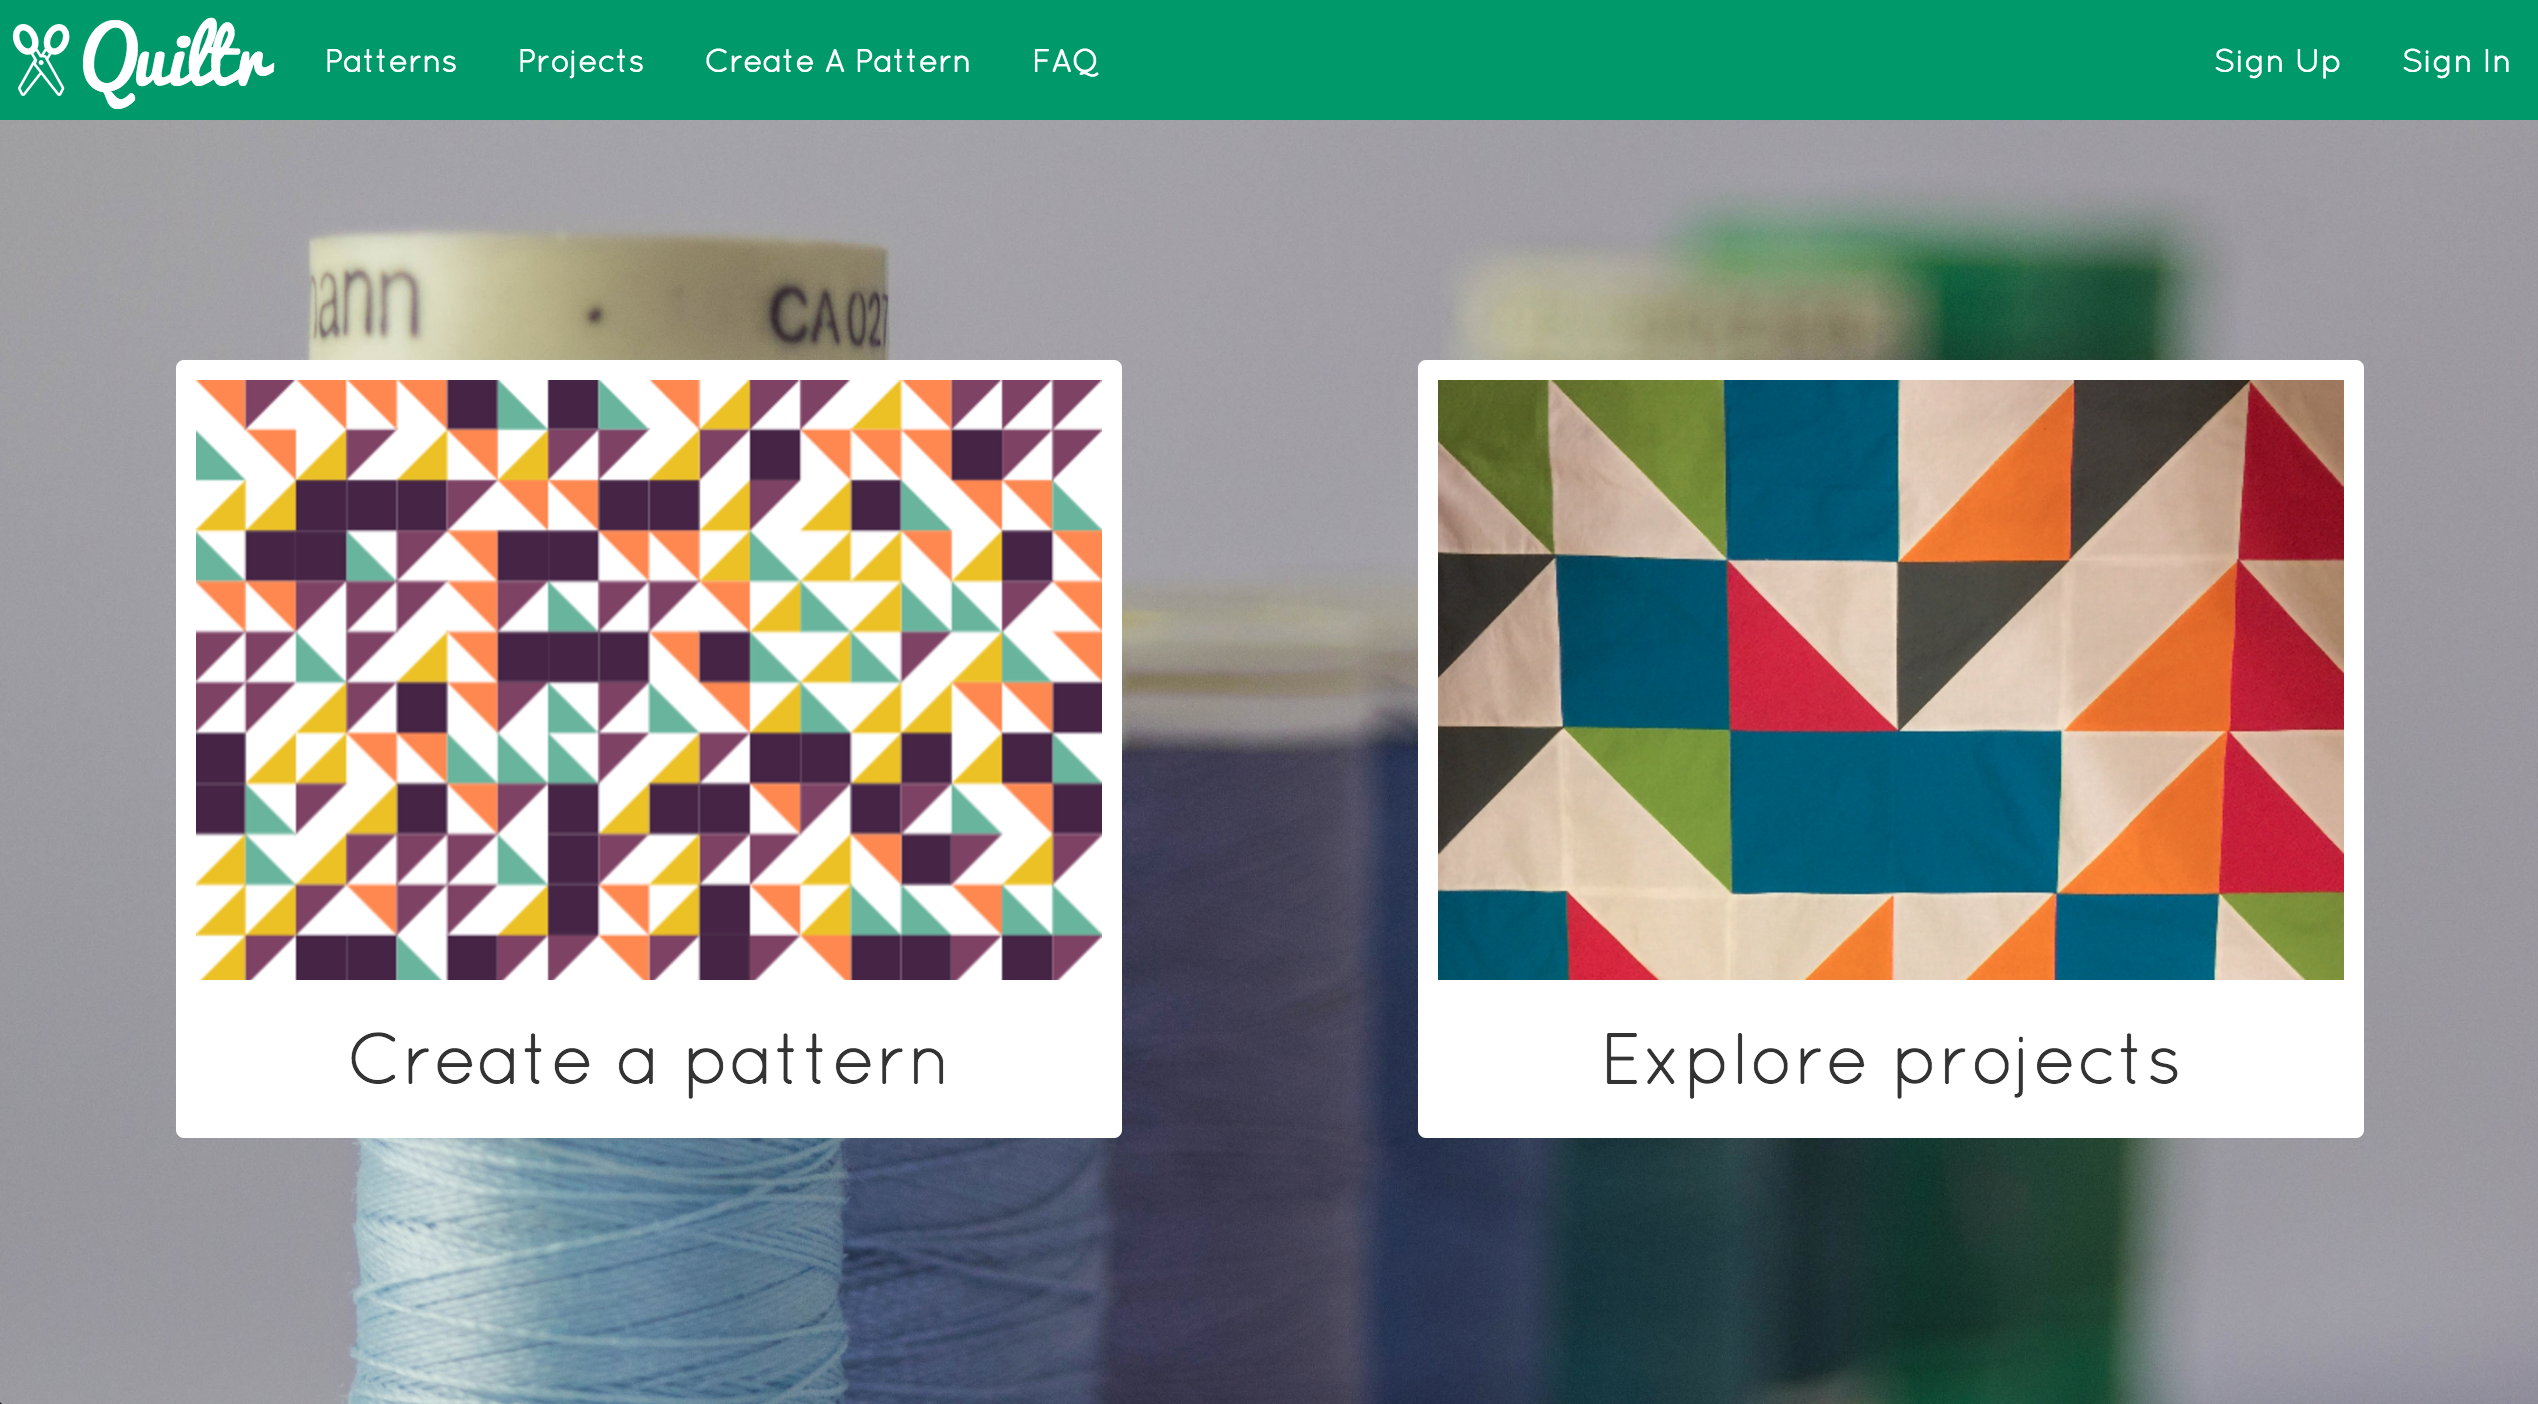
Create patterns. Make quilts. Be inspired.

Live app: https://rhjones.github.io/quiltr/
Live API: https://quiltr.herokuapp.com/
Ember repo: https://github.com/rhjones/quiltr
Rails API repo: https://github.com/rhjones/quiltr-api

General Assembly WDI, Week 11

Ember!

Week 11 of Web Development Immersive was all about Ember (the JavaScript framework, not the IOT coffee mug or the surprisingly tasty “toasted chai cider”).

Day 49

Important things to know about Ember:

  • Ember is an open source JS framework. It’s mostly used to build web apps, but it can be used for mobile or desktop apps (e.g., Apple Music).
  • Like Ruby on Rails, Ember is an opinionated framework that follows “convention over configuration.” It provides a lot of built-in structure and help, as long as you follow patterns. In exchange, you get to spend less time setting things up and piecing them together. (The downside: if you want or need to break conventions for some reason, you have a lot more work ahead of you than if you were using a less opinionated framework like Backbone or a library like React.)
  • Ember handles client-side routing (which makes me very happy, as I established in last week’s post). Routes in Ember parse a URL, connect a router to a template, and load any necessary data into that template via a related model. Routes can also redirect (for example, if a guest user tries to access a route that’s only available to authenticated users) and handle actions that involve altering data or transitioning to a new route.
  • Ember writes most AJAX calls for you, if you follow convention. Ember is a fan of JSON API, but you can customize an Adapters to tell Ember how your API is formatted and how to interact with it. Adapters handle the relationship between your data and how you store that data (on the back end, in Ember’s cache, and in test fixtures).
  • Ember caches data on the client side, which makes your apps faster. Ember also allows you to change data on the client side without persisting it to the server (which creates something called “dirty attributes”).
  • Ember binds data, meaning (briefly) that updating a piece of information will update all persistently related information—we’ll talk about this more soon, but the gist is that Ember 2 uses one-way data binding: data is bound down (from a model associated with a route down through templates/components), and actions affecting that data move up (from a component up through to the template to a route and the related model). This is a change from Ember 1, which used two-way data binding, in which changes made in the view are automatically updated at the model level. With large, complex applications, this can slow things down and cause unintended consequences that can be hard to track down and debug.
  • Ember 1 used views and controllers; Ember 2 has shifted toward components. Components have templates (not unlike views) and contain properties and methods associated with specific UI. You can invoke a component from a template associated with a route or from another component. Components don’t have access to the broader scope of a route—their scope is defined explicitly at the location where they’re invoked. Components are modular and reusable—an example might be a button to “like” a video on Vine, which is shown when you’re looking at the specific video and also shown next to each video when you’re looking at a list of videos.
  • The Ember command line interface (CLI) is a handy tool that simplifies the process of setting up Ember apps. The Ember Inspector is a browser extension that helps with debugging and inspecting Ember objects in the browser.
  • Ember uses special Ember Objects (which are a class in Ember), which enable data binding in Ember. Among other things, using Ember Objects allows for the creation of computed properties, which calculate properties of an object based on the values of other properties of that object. Computed properties “watch” the properties on which they depend and will update on the fly as those properties change. They’re a little bit like virtual properties in Mongoose, but they’re more aware.

Cool things to know about Ember:

  • Ember was created by Yehuda Katz, who was also instrumental in Ruby on Rails and jQuery (and created Handlebars). Ember feels a lot like Rails in many ways, and uses Handlebars for its templates.
  • There’s an Ember conference on the Boston Harbor Islands each summer, which sounds awesome.

Day 50

Routing

Tuesday was about routing and components. We talked first about static routing, which you might use for something like /about, which would display a view containing your hypothetical personal library site’s “About” content, or /books, which would list all of the books. We then talked about nested routing—let’s say your /about view has some general “About this library site” content, but you actually run the site with two of your friends, and each of you has a bio and a personal philosophy on literature that you’d like to display beneath the About content at, say, /about/helga. Nesting routes lets you display the content for Helga inside of the About content. Inside the template for the /about route, you add Ember’s {{outlet}} helper. When you visit a nested route (/about/helga), the template for that route will render inside of that helper.

Next up: dynamic and resource routing. Resource routes in Ember (or Rails, or other frameworks) are routes that are associated with a specific data resource—the /books example above is one, as it maps to a books resource on the site’s back end. Conversely, /about is not a resource route, as (in this example) it doesn’t draw on any data; it contains static content about the site. When you’re working with resources, dynamic routing becomes important—we might expect a route that looks something like /books/1 to show us the first book. Dynamic routing lets us create routes like this without having to specify a route for each individual book. Instead, the route contains parameters that indicate which resource to load within a view. Instead of /books/1 and /books/2 and so on, we can create a route for /books/:book_id to handle all possible cases for us. (As a side note, this isn’t a new concept—we covered parameters like this in Rails in Week 5.)

Components

On to components: components are reusable pieces of UI within an Ember app. Knowing when to split component out of a template is a bit of an art, but generally, if you’re starting to work with replicable actions (for example, a button that looks like a pencil that means “click this to edit something,” that you want to reuse for different kinds of objects throughout the app), it’s a good idea to use a component.

A few things to know about components:

  • Components can be nested within routes and within each other, and components can be used multiple times in a single view.
  • Components must have at least one dash (-) in their name to prevent clashes with HTML elements and help Ember recognize them automatically.
  • Components don’t have a model hook, meaning any data they receive needs to come from a parent route.
  • By default, Ember wraps all components in a div. You can customize a component’s element and its class, if you want.
  • Components can “send” actions up to their parents, which is how you would, say, move from clicking the pencil button next to a blog post up to a route that recognizes that what you want to do is edit blog post #7 and transitions you to the correct edit view. This is Ember’s “data down, actions up” convention at work.

Day 51

Now that we have a better handle on how Ember applications are structured and how to map routes to views (which may or may not contain components), it’s time to talk about data. As already mentioned a few times, Ember uses unidirectional data flow: data down, actions up. Data comes in through a model hook that is associated with a route, and is passed down through that route’s template to any components. When actions happen at the component level, they are bubbled up (using sendAction) to the route. Data is only ever changed at the route level (generally speaking / when following best practices), and the UI only changes when something changes in the data store or after a successful response from an API call. This is called “pessimistic” UI, where the UI is the last thing to update. This is different than frameworks that use two-way data binding, where actions at the component/lowest level take immediate effect on the UI and simultaneously persist any changes on the back end.

Data binding in Ember involves, in part, passing the correct data down to a component. Let’s say you have that edit button, and you want to include it in the view for a single book. You might do something like {{edit-button book=book edit='edit'}}. In this example, edit-button is the component; book=book points the book value in the component to the book data coming in from the model, and 'edit' is the name of the action bubbling up from that component (this.sendAction('edit')), which the route is listening for under the name edit. We’re binding the book data down, and sending the actions back up to the route.

Ember applications include Ember Data, a library that handles data models and interaction with those models through adapters and serializers. Adapters handle making requests to servers. Adapters enable Ember to interact with data stored in a variety of places and formats, from localStorage to WordPress to Elasticsearch to Rails. (Ember Data also works with streaming servers, for apps that update in real time.) Serializers format the data on its way to and from the server. Ember comes with three different serializers (JSON API, JSON, and REST), but you can also write custom serializers if your server provides or expects data in a different format. An example: we worked with an API that returned a piece of information called content. “Content” is an internal property used by Ember Data, which means we needed to rename this data to something else so we could use it in our app without causing conflicts. We wrote a custom serializer that renamed “content” to “item,” which solved the problem.

Collectively, Ember Data, adapters, and serializers allow you to work with data via models and the Ember data store. Different routes (or component that send actions up to routes / display data that is bound down from routes) ask the store for data through different models. Data needed in multiple parts of your application is fetched only once and held in the store, and different pieces of UI can then quickly grab the data they need from the store rather than making redundant requests to the API. This speeds up your application (you’re not waiting for the response to an AJAX request every time you switch to a new view), and puts all responsibility for fetching data in a single place (the store), rather than splitting it out across different components and routes.

Day 52

We spent Thursday working with templates in Ember and building out a simple todo list application. As mentioned above, Ember uses Handlebars as its templating language; Ember comes with a handful of built-in Handlebars “helpers” that do things like conditionally display content or loop over content. You can also write your own helpers to do things like format date and time values. Ember also has a set of built-in input helpers for working with forms (you might notice there’s no way to use a select element with these helpers—fellow GA grad Jen Weber has written up a simple guide to creating a select element in Ember.js targeted at beginning Ember users).

Day 53

On Friday, we talked about authentication in Ember. We were provided with an Ember template that includes the code to handle authentication via a Rails API that follows the Rails API template also provided by GA. The gist:

  • The API requires users who want to access protected resources to sign up with an email address, a password, and a password confirmation field that matches the password.
  • The API requires users to sign in (using their email address and password) before accessing protected resources. The API returns a token from a successful sign in request. This token must be included as a header with all requests for protected resources, as well as on requests to sign out. The token is deleted/invalidated on sign out and cannot be used again.
  • The Ember application includes two custom services, auth and ajax, which are injected into one another.
  • The auth service uses the ajax service to make the appropriate AJAX requests for sign up, sign in, change password, and sign out. Upon successful sign in, the response data from the server (user id, email address, and token) is stored in a credentials object. On sign out (whether or not the response from the server indicates success), the credentials object in Ember is reset, and the data is cleared.
  • The ajax service extends ember-ajax, which offers methods to make AJAX requests in Ember. The custom service sets an Authorization header before AJAX requests that includes the authenticated user’s token, if there is an authenticated user. This header is used for all requests Ember makes to the API, which gives authenticated users access to protected resources throughout the app.

After covering auth, we were given Friday afternoon to start work on our capstone projects, the last piece of the Web Development Immersive program (!). Friday afternoon was one of the hardest/best days of all of GA for me—more on that in my Week 12 / capstone project post, which I promise is coming soon(ish).

General Assembly WDI, Week 10

Hungarian folk dancers and Hugo.

Day 45

Monday was “Computer Science Day,” which put me squarely in one of my happy places. One of my favorite things in all of Boston is the Bean machine at the Museum of Science, which illustrates the central limit theorem (specifically, the law of normal distribution, aka a bell curve):

Searching & sorting algorithms (which, along with data structures, were the primary topics of the day) tickle that same space in my brain, and come with even more fun videos. Some of my favorite resources for learning about those algorithms, and by extension Big O notation and time/space complexity:

For the data structures portion of the day, we split into groups and each researched a single structure, then presented to the class. My group had linked lists, which are really fun to draw on the board (but maybe not as much fun as tries). Some good resources for learning about these:

  • The CS50 week 5 notes and the “Data Structures” section of the study guide
  • The Wikipedia articles on the major types we covered (lists (including primitive arrays, stacks, and queues), linked lists, associative arrays, trees, graphs, and tries) are pretty good. Wikipedia also has an extensive list of data structures.

Days 45-47

We kicked off Tuesday morning with a giant brainstorming session. The prompt: what technologies and related issues have we not yet covered? It was a long list, and not nearly exhaustive. The goal was to provide starting points for our next assignment: a 15-minute presentation on a topic of our choosing.

This was fun. And overwhelming. And fun. My brain jumped immediately to things I’ve worked on or heard about at Berkman—digital security, Internet censorship (which one colleague chose for her presentation—I was excited to point her to the OpenNet Initiative and Internet Monitor!), Elasticsearch, Kibana, PGP/GPG. I decided to go a completely different direction for my presentation, though, and chose to talk about setting up a code blog with Hugo.

I’m a little behind (only now writing about Week 10 of 12, even though I finished the program in mid-November), but I’ve been doing my best to blog about the code I’m writing and the concepts I’m learning since starting the Web Development Immersive program. I think it’s one of the best things I’ve done for myself as a developer. I’m not always as clear or concise as I’d like to be, but going back through my notes, attempting to distill concepts, and giving myself a second chance to dig into anything that was confusing or particularly intriguing the first time around has helped me retain information, get feedback from others inside and outside of the program, and test my own understanding.

Why Hugo, specifically? Mostly because I’m getting a bit frustrated by WordPress’s bloat and would like to see if I can make the experience of blogging and browsing a bit faster. Jekyll was my first thought, given the size of the community (huge), its connection to GH Pages (which I’ve used for the last four of my public projects), and its use of Ruby (a language I’d like to get better at), but Hugo won me over for its speed argument alone, given that I’d like to port over this blog, which has over a decade’s worth of content. I haven’t yet gone through the process of exporting all of my content to markdown/comments to Disqus and importing them into a Hugo site, but it’s on my to-do list. In the meantime, I put together a quick presentation/tutorial about how to get started with a very basic portfolio site (above) and managed to spark interest in a couple of classmates, which was exciting.

Day 48

I don’t have enough exclamation points to convey my excitement about CLIENT SIDE ROUTING!!!! One of my frustrations throughout the program has been that all of our single page apps only handle/offer a single URL. Want to share a Go Bag packing list with a friend? Nope. Want to send around your Happening event invitation? Nope. Finally getting my hands on (one of) the (many) tools to solve this problem felt so good.

Some basics, if you’re unfamiliar with client side/front end routing: A lot of people are building “single-page applications” these days, which load data dynamically, behind the scenes, as the user interacts with them. The page is never reloaded in the web browser, which makes the user experience a bit faster/more seamless. Because you’re only working with a single web page, you also only have (by default) a single URL. You can check out my packing list app Go Bag for an example of this—logging in, signing up, creating a packing list, editing items, and viewing different lists all happens at https://rhjones.github.io/go-bag/. This is a bummer: what if you want to share a list with a friend? Or send them directly to the sign up page? Or (wait for it) use the back button in your browser? None of this works “out of the box” with a single page application.

Enter: client-side routing, which solves this problem by mapping different parts of a single page web application (like a single packing list, or the view that lets you create a new list, or the log in form) to different URLs. Suddenly, you can bookmark URLs! Share them! Go back and forth between them using the buttons in your browser! It’s like having your single page application cake and eating it, too.

There are larger front-end frameworks that will handle this for you, but we dipped our toe in the water using Router5. We started with a simple HTML page with three divs and a nav bar with three matching links. Each link was tied to an event handler that, when a user clicked the link, would add/remove a “hidden” class to the appropriate divs to “swap out” the desired content. Along the way, the URL never changed.

Using Router5, we refactored this code to instead define a series of routes that matched the previous links and register a series of URL paths based on the internal anchor links. Clicking on one of these links now uses the navigate method of Router5 to navigate to a specific route (i.e., change the URL and execute code associated with that route). We also defined a middleware function that is executed on each transition between routes. This function takes care of adding/removing the “hidden” classes to display the content associated with each route. Ta-da! Functional, shareable URLs that map to specific pieces of a single page JavaScript application.

The goal here was to demonstrate, very simply, how client side routing works and to familiarize us with the concept of associating specific view states with different routes in preparation for working with Ember, which we covered in Week 11. Ember uses Router.js, not Router5, but the principles hold.

General Assembly WDI, Week 9

Group projects & interview practice!

Days 40-43: Group Project

The third project for General Assembly was a group project. Each group received a prompt and roughly five days (including the weekend) to execute on it, starting Friday night on Week 8.

Our prompt:

Make an app that can be used to create custom surveys (for instance, asking “what should we eat for lunch today?” or “On a scale of 0-5, how well did you understand what we just learned?”) and collect the responses on a dashboard for that particular survey.

Data Modeling

One of my group members (thanks, KTab!) suggested that we build an online invitation tool instead—the underlying principles (ask a question, collect responses from different users) are the same, but the premise felt a little more fun. We drew up a quick ERD in LucidChart (which is becoming my favorite tool for data modeling) and were feeling pretty good about it:

draft data model for Happening (relational)

So pretty! See all those beautiful tables? and fields? and carefully documented relationships?

That’s about when we remembered we were required to use MongoDB & Mongoose instead of a SQL database. (Other requirements: use Express to build a RESTful API, built a JS-based client app to consume data from that API, include user authentication, include all CRUD actions, write user stories, build wireframes, use git/GitHub as a team.)

Awkward. Mongo doesn’t have tables or relationships or models. Mongoose lets us add models and relationships (-ish), but there are still no tables.

We attempted to convert our relational model into a rough sketch that approximated something more document-friendly:

User {
  _id,
  email,
  password,
}

Survey {
  user_id,
  _id,
  title/name,
  date,
  time,
  location,
  image_url,
  options: [
    { id, text },
    { id, text },
  ]
}

// less sure about this
Response {
  option_id,
  user_id
}

This more or less attempts to map our tables onto documents. Which, as far as I can tell, is rarely the best approach: trying to convert a relational data model for use in a NoSQL database seems like it only leads to heartache.

On Friday evening, our group had a long talk with our instructional team about our model, in which they attempted to convince us that what we should be storing as a response—instead of links to an option id and a user id—is a full copy of an event/survey, with the options array replaced by whatever the user chose for their answer. And we could forget

Cue all the feelings of ickiness about data duplication and potential out-of-sync-ness and, again, data duplication. Data duplication is also called data denormalization: this is good for reducing the number of queries needed; it also reduces number of write operations needed: you only need to write to one document to affect lots of data. But still: THIS FEELS SO DIRTY.

Part of the argument was that storing a full copy of an event/survey (which I’ll refer to as an “event” from here on out) inside of a response means that a user’s response to a question isn’t affected if the event owner changes the event. In both our initial relational model and the model above, an event owner could change the question associated with an event from something like “Are you coming?” to “Do you eat hamburgers?” A vegetarian reader who had RSVP-ed yes could suddenly find themselves having committed to eating meat. Storing an entire copy of the event as it was when the user responded inside of the user’s response means that a response and a question are never out of sync. This is a good thing!

What’s not as good: events and responses are never reliably in sync. (I’m intentionally setting aside the pros and cons of letting a user edit an event after people have already responded—this is weird functionality that has a lot of potential issues, both technical and social.) This means that response data can’t as easily be counted and presented.

After some back and forth, we decided to go with this approach. We rewrote our data outline to look like this:

User {
  _id,
  email,
  password,
  username,
}

Event {
  _id,
  _owner (references user id),
  name/title,
  location,
  date,
  startTime,
  endTime,
  description,
  questions: [
    {	
      text: Are you coming?,
      options: [yes, no, maybe]
    },
    {	
      text: Which dinner option do you want?,
      options: [fish, chicken, pasta]
    }
  ]
}

RSVP {
  _id,
  _event (references event id),
  _owner (references user id),
  questions: [
    {
      text: Are you coming?,
      answer: yes
    },
    {
      text: Which dinner option do you want?,
      answer: pasta
    }
  ]
}

I’m still pretty uncomfortable with this. A couple of things I’m still working out:

  • Does copying (“serializing”) an event into a response make sense? Duplicating event data (things like title, location, etc.) means that displaying a single RSVP requires only a single query to the RSVPs collection, rather than a query that accesses both the RSVPs and the events collections. It also means that if a user changes anything about an event—updates the description, for example—that change isn’t automatically propagated over to each corresponding RSVP. It would be possible, I think, to write code that updates each RSVP when an event is updated, but a) that’s potentially database-intensive in a way that feels dirty to me; and b) that kind of defeats the point of serializing data in the first place.
  • Does allowing a user to edit an event after it has received RSVPs make sense? I can see arguments for an against this. We currently have a warning message on the edit page that lets event owners know that changing data related to questions & answers might affect the responses they see, but this is a human (not a technical) way of handling things, and it doesn’t feel entirely sufficient.
  • If a user does edit an event and change the associated questions/answers, what happens to someone who’s already responded? Does their data “count”? Should their answers still be reported to the event owner/as part of the event? We’re currently looping through the questions/answers on the event and tallying up matching answers in any associated responses, which means that only responses matching the current version of the event data get counted. Again, this doesn’t feel like the optimal approach.
  • In general, tallying response data feels less efficient: we have to locate an event, locate all of the responses, and then inspect the data within the event to find the current questions and answer options. We then have to compare that data to each response and evaluate whether there’s a match. In a relational database, we’d need more queries, but it would be much easier to get counts. We’re also doing all of this based just on string comparison, rather than on database ids, which makes me…sort of itchy. (This is related to, but not entirely the same as, my question about editing events, above.)
  • We’re currently leaning on Mongoose’s .populate method to retrieve all of the RSVPs that belong to an event when we get an event. After reviewing the code, it looks like I for some reason also set up a virtual property on the Event model that gets all of the RSVPs. I’m pretty sure this is redundant/not actually doing anything—adding this to my list of future revisions. Also, we’re populating the RSVPs for an event in order to do two things: 1) check RSVPs and do some filtering so a user isn’t given the option to re-RSVP to something they’ve already responded to; and 2) tally up responses. It looks like we could be using Mongoose’s field name syntax to only grab the user ids and the question/answer data, which would help streamline things, which makes me happy.
  • This is less “a thing that makes me uncomfortable” and more “a thing I’d like to do in the future,” but right now, we’re not handling different question types very well: responses are set up to only hold a single answer for a question, and questions in an event have an array of possible answer options. This doesn’t work well for things like open-ended questions, multiple answer questions, etc. I’d like to come back to this and think about how to better handle a range of question types.
  • We got our API up and running over the weekend (nothing like a Bagelsaurus-fueled Saturday marathon coding session) and met with the instructors again on Monday for feedback. They brought up another possible approach we hadn’t considered: setting up a separate “statistics” controller in Express to handle population and data tallying. This would involve making a query to the events collection for the event, then making a secondary request to a stats route (which would then presumably query the RSVPs collection?), and *then* building out whatever data display we wanted. This isn’t super efficient, but it is clean: what I took away from the conversation is that it’s a bad idea to have the event & RSVP models talk to each other inside of the model (like we are with the virtual property)—we want to avoid having a “junk drawer” model in the app that essentially pulls in data from all of the other models. To be totally honest: we considered this idea for a minute and decided to forge on without implementing it because the API was functional, it was Monday, and we had three days to build the client app.

After our feedback meeting, we took away a list of to-dos related to our API:

  • Make sure to delete all RSVPs associated with an event before deleting the event. My understanding is that because we’re using Mongo and Express, the only way to do this is manually—there’s nothing like Rails’ dependent: :destroy.
  • Build a way to show all events to a user that don’t belong to the user AND to which a user hasn’t RSVPed (a list of all RSVP-able events for a user).

The first of these was fairly trivial: in the destroy method in the events controller, first remove/delete all associated RSVPs, then delete the event.

The second of these was more difficult. We attempted this:

Event.find({ $and: [ { _owner: {$ne: req.currentUser._id } }, { 'rsvps._owner': { $ne: req.currentUser._id } } ] } )

Which did not get us what we want: you can’t directly query populated data like this. On the advice of our instructors, we ended up finding all events where the owner is not the current user, then using .foreach() to loop through each rsvp for each event and determine whether the current user owns any of them (whether the current user has already rsvped for the event). The logic was sound here, but it took us longer that I want to admit to process that MongoDB ids are not strings. Doing a comparison—even a loose one—between rsvp._owner and req.currentUser._id was getting us nowhere until one of my groupmates (thanks, Jaime!) suggested that we call .toString() on the ids. Success!

Now that we’re not under the wire, I’m realizing that Query#populate might have gotten us closer to what we wanted, and Query#select the rest of the way, without having to loop through all of the data. I’d like to go back and try this—if it works, it would definitely be a cleaner approach.

Client-side App

With our API all squared away, we spent Tuesday and Wednesday working on the front end. This was fairly straightforward—it didn’t differ too much, structurally speaking, from the front ends we had all built for our second projects.

The two most difficult pieces were both tied to questions and answers: figuring out how to count up and display response data, and figuring out how to correctly display and gather question & answer data from forms. (In Boston, GA offers a “get form fields” JS script that extracts data from form fields and, based on the name attributes of each field, formats it as a JavaScript object. This is usually sufficient, but I couldn’t quite manage to figure out how to name our inputs in order to end up with an array inside of an object that also contains a property that’s a string, and have of that end up in another array that’s inside of an object. I eventually ended up with input fields for the answer options that are named event[questions][0][options][], but I haven’t yet worked in the ability in Handlebars to generate multiple questions (event[questions][1][options][], etc….)

We started with a pretty low bar, initially: event creators would have no say over questions and answers. Instead, all events would have a single question (“Are you coming?”) with three potential answers (“Yes”, “No”, and “Maybe”). We wrote our forms (using Handlebars templates) and our “tallying” code to handle this case, and then decided to expand incrementally: first by writing more flexible tallying code that would match up the event’s question and answer options against the responses, and then by allowing event creators to edit a single question with three required answer options.

The next step—on my list of to-dos—is to give event creators the power to add multiple question possibilities with variable numbers of answers. Our API is set up to handle this, but the front end doesn’t yet have the flexibility to add/remove the necessary form fields to expand/contract the set of questions and answers.

A third interesting and kind of tricky piece was handling date and time formatting between Mongo, form fields, and display. I ended up writing a tiny library of functions to handle this for us, and then—during our presentation—learned about Moment.js. Next time!

Aesthetics

Our design came down to the wire a bit—we prioritized, I think rightly so, API and UI functionality over shine. That said, we managed to get in a few custom colors/fonts and a background image for the home page. This is definitely on the “come back to” list—we have a long list of ideas (uploading header images for events! changing an invitation’s color scheme based on those images! offering different invitation designs! fully responsive design! among other things) we’d love to implement going forward, but as of Wednesday evening, we had a fully functional product with an acceptable design.

Happening

screen-shot-2016-11-02-at-3-30-24-pm

Happening: Online invitations for events big and small
Happening API on GitHub
Happening client on GitHub

Day 44: Whiteboarding

We spent Friday split into our new (and final!) squads, practicing interview questions with the instructors, with our course producer, on CodeWars/HackerRank/Interview Cake, and with a group of GA alumni who came in during the afternoon and ran mock whiteboard interviews with us. It’s not exactly news, but technical interviewing is a totally different skill than building web applications. I think I like the data side of things the best (see: this post), but my current sense of the industry is that to move decisively in that direction, I’ll need to get much better at “traditional” computer science skills and concepts, including algorithmic thinking, pattern recognition, and math. In particular, I’d like to improve my ability to draw upon this knowledge quickly during interviews. On the advice of a friend, I’m working my way through Cracking the Coding Interview and spending as much time as I can on HackerRank.

Friday was intense, especially coming off of project week, but it was also fun. I’ve always loved tests, and the questions I was asked—which ranged from “design a Monopoly game” to “what is a closure” to “what’s your favorite programming language and why?” to good old fizzbuzz—stretched my brain in different directions pretty rapidly, which was good practice.

Just three more weeks to go!

General Assembly WDI, Week 8

In which I meet my nemesis/MongoDB.

Can we all agree that we’re collectively going to ignore the fact that we just wrapped up week 10, and I’m only now getting around to writing up week 8?

Yeah?

Awesome. You’re all the best.

Day 35

Monday was the day I learned about MongoDB, about which I’m…conflicted. Right now, I’m siding pretty hard with Sarah Mei’s treatise on Why You Should Never Use MongoDB.

For those who are new to Mongo: it’s a NoSQL database. NoSQL databases are generally better at scaling and overall performance. They’re more flexible, and they’re (allegedly?) better suited to agile workflows, where you might be making adjustments to your database schema as often as every couple of weeks. Instead of storing data in rows and tables, they store data in documents and collections of documents—essentially, as JSON that’s fairly agnostic about what it contains. What they’re not: relational. I don’t yet have personal experience working with non-relational data, and I think Sarah makes a convincing argument that most data is relational, but I’ve been trying to come around to the possibility that Mongo might be the right choice for some things. Todd Hoff makes some good points; I’m still mulling over these.

After Mongo, we talked about Node: Node is a JavaScript runtime that lets you do things like interact with the file system or write a server. Typical uses of Node rely pretty heavily on asynchronicity, which let us build on what we learned last week about promises. We started by using Node’s HTTP module to make a request to a Node-based echo server, using both traditional callbacks and then* promises.

*LOLOLOLOLOL promise joke.

Day 36

On Tuesday, we examined the echo server we made requests to on Monday. Key things a Node server needs to do:

  1. create server instance
  2. pass at least one callback to do work
  3. receive request
  4. do any necessary processing
  5. make response
  6. send response
  7. close connection

Rails did all of this for us, but in Node, we have to write it all. All of this server code is what’s behind Express, which is a library/framework that adds (among other things) routing capabilities to Node servers. We touched quickly on Express and promised to come back to it later in the week.

Day 37

Actually working with Mongo came next: we ran through basic CRUD functionality from the command line, then moved on to Mongoose, which lets you define data models in Mongo and felt a little bit like having some of my sanity restored. Quick cheat sheet:

rails : node
active record : mongoose
ruby object : js object
sql : mongodb

Mongoose also gives you the ability to set up “virtual” properties on your data models, which are properties you calculate on the fly based on real, non-virtual properties on those models. For example: you can define a virtual property on a Person model to calculate a person’s age based on the current date and on that person’s birthday, which is stored in the database.

We also came back to Express and wrote a simple Express API. This felt good and familiar—I’ve seen this process in Laravel, in Rails, and in Express, now, and I’m starting to feel like I’m gaining a little bit of fluency with the process of setting up routes and controllers across different languages/frameworks.

Day 38-39

We spent part of Thursday morning going over Agile and Scrum to prep for our upcoming group project. I’ve heard about Agile a few times—at an HUIT summit a couple of years ago, when I was trying to figure out how best to work with various teams in my last job, and at a Boston Ruby meetup earlier this month. I’m a total process and organization geek, and I’m excited at the prospect of working within an agile framework up close.

The rest of the week was devoted to learning how to upload files to Amazon Web Services S3 using Express and Multer. We started by writing a command line script (along the way, I learned about the shebang: #!), then moved on to writing a simple web app that would accept a file and a comment about it, upload the file to AWS S3, and store the URL and the comment in a Mongo DB.

I’d like to come back to this—we didn’t end up needing to use it in our group project, but I have a couple of ideas for how to incorporate this, and I’d love to implement them at some point.

We got our project prompts on Friday evening and headed straight into group project work for most of Week 9. I’m working on that post now, so stay tuned for my notes-slash-ravings on data modeling for a survey builder application in Mongo/Mongoose!