Can we all agree that we’re collectively going to ignore the fact that we just wrapped up week 10, and I’m only now getting around to writing up week 8?
For those who are new to Mongo: it’s a NoSQL database. NoSQL databases are generally better at scaling and overall performance. They’re more flexible, and they’re (allegedly?) better suited to agile workflows, where you might be making adjustments to your database schema as often as every couple of weeks. Instead of storing data in rows and tables, they store data in documents and collections of documents—essentially, as JSON that’s fairly agnostic about what it contains. What they’re not: relational. I don’t yet have personal experience working with non-relational data, and I think Sarah makes a convincing argument that most data is relational, but I’ve been trying to come around to the possibility that Mongo might be the right choice for some things. Todd Hoff makes some good points; I’m still mulling over these.
After Mongo, we talked about Node: Node is a JavaScript runtime that lets you do things like interact with the file system or write a server. Typical uses of Node rely pretty heavily on asynchronicity, which let us build on what we learned last week about promises. We started by using Node’s HTTP module to make a request to a Node-based echo server, using both traditional callbacks and then* promises.
*LOLOLOLOLOL promise joke.
Day 36
On Tuesday, we examined the echo server we made requests to on Monday. Key things a Node server needs to do:
create server instance
pass at least one callback to do work
receive request
do any necessary processing
make response
send response
close connection
Rails did all of this for us, but in Node, we have to write it all. All of this server code is what’s behind Express, which is a library/framework that adds (among other things) routing capabilities to Node servers. We touched quickly on Express and promised to come back to it later in the week.
Day 37
Actually working with Mongo came next: we ran through basic CRUD functionality from the command line, then moved on to Mongoose, which lets you define data models in Mongo and felt a little bit like having some of my sanity restored. Quick cheat sheet:
rails : node
active record : mongoose
ruby object : js object
sql : mongodb
Mongoose also gives you the ability to set up “virtual” properties on your data models, which are properties you calculate on the fly based on real, non-virtual properties on those models. For example: you can define a virtual property on a Person model to calculate a person’s age based on the current date and on that person’s birthday, which is stored in the database.
We also came back to Express and wrote a simple Express API. This felt good and familiar—I’ve seen this process in Laravel, in Rails, and in Express, now, and I’m starting to feel like I’m gaining a little bit of fluency with the process of setting up routes and controllers across different languages/frameworks.
Day 38-39
We spent part of Thursday morning going over Agile and Scrum to prep for our upcoming group project. I’ve heard about Agile a few times—at an HUIT summit a couple of years ago, when I was trying to figure out how best to work with various teams in my last job, and at a Boston Ruby meetup earlier this month. I’m a total process and organization geek, and I’m excited at the prospect of working within an agile framework up close.
The rest of the week was devoted to learning how to upload files to Amazon Web Services S3 using Express and Multer. We started by writing a command line script (along the way, I learned about the shebang: #!), then moved on to writing a simple web app that would accept a file and a comment about it, upload the file to AWS S3, and store the URL and the comment in a Mongo DB.
I’d like to come back to this—we didn’t end up needing to use it in our group project, but I have a couple of ideas for how to incorporate this, and I’d love to implement them at some point.
We got our project prompts on Friday evening and headed straight into group project work for most of Week 9. I’m working on that post now, so stay tuned for my notes-slash-ravings on data modeling for a survey builder application in Mongo/Mongoose!
The first three days of Week 7 were devoted to our projects: Monday and Tuesday were work days, and Wednesday was for presentations. If you want a blow-by-blow of project two, I wrote up my daily dev log here.
While working on my project, I had an interesting conversation with one of the GA instructors about the API we use for our first project (Tic Tac Toe). I built a feature for my version of the game that gets all of a user’s prior game history when they log in and goes through each game that’s marked as “over” to calculate whether the game was a win, loss, or tie. These stats are tallied and displayed at the bottom of the window, and are updated as the user plays new games.
It doesn’t take a long time to calculate these stats—the logic isn’t terribly complicated, the entire package of data is pretty small, and, seriously, how many games of Tic Tac Toe could one person ever want to play? But I’ve been thinking about how much easier this process would be if, at the end of a game, we could just store the winner (or “tie”) on the server. That would let us avoid re-calculating the winner for each game just to get a stats counter.
After I made my pitch, I got a quick introduction to memoization, which is when you store data that takes some time to calculate on a server, so you can retrieve it rather than recalculating it each time. The key point we covered: memoization without validation can be dangerous. It would be easy to mark a player as the winner without the game being over and/or without that player having won. Also, for Tic Tac Toe, it’s not really a big issue, as it’s not that computationally expensive to re-tally the stats each time (it’s also, as was pointed out to me, a good exercise for us). Another point: memoization involves a tradeoff between time (to recalculate) and space (to store extra data on the server). Lastly: this is still a bit above my paygrade as someone relatively new to the field. But it’s cool to be thinking about!
Another couple of things that came up during project presentations that I want to remember:
A handful of people recommended Bootsnipp for examples of good uses of Bootstrap for specific UI elements (things like testimonials or five-star ratings).
One person made the best wireframes using Balsamiq. I experimented with creating my wireframes in LucidChart, since I had already sketched out my data relationship model there, but I ended up drawing them by hand, which was faster and easier. But those Balsamiq wireframes…they were gorgeous.
It’s a bad idea, optimization-wise, to include an entire font in your project if you’re only going to use a couple of characters (for a logo or an icon, for example). It slows down load times, especially on mobile; it’s better to make a .png of what you need and use that instead. Guilty as charged—going to try to do better next time.
Day 33
After a quick review of distributed git workflows (our next project is a group project), we jumped back into JavaScript to talk about this.
Though I think (hope) I’m starting to get a better handle on it. We talked about the “four patterns of invocation” (described by Douglas Crockford in JavaScript: The Good Parts):
Function Invocation Pattern: If you call a function in the global namespace, this refers to the global object. In the browser, this is the window; in Node, you’ll get the node object. Note that this is not true if you’re using 'use strict'—strict mode disables this from pointing to the global object; instead, it points to undefined.
Method Invocation Pattern: If you call a function on an object (dog.bark()), this refers to the “host object” (the object on which you called the method). Inside of bark(), this will be dog.
Call/Apply Invocation Pattern: You can use .call() and .apply() to pass an object to a function and use that object as this. If dog.bark() uses this.name to return "George is barking", dog.bark.call(giraffe) would return "Geoffrey is barking" (assuming your giraffe is named Geoffrey). .call() and .apply() have the same result; the difference is in the signature (.call() takes a list of args; .apply() takes the object and then an array of args). Mnemonic (from CodePlanet): “Call is for comma (separated list) and Apply is for Array.”
Constructor Invocation Pattern: If you create a new object with a constructor function by invoking that function with new (new Dog), then this (when using the methods that exist on that constructor’s prototype on that new object) will refer to that new object.
Here’s where my understanding gets a bit fuzzy—I’d like to review these two points a few more times:
You can attach .bind() to a function to create a new “bound” function that uses the object you pass to .bind() as its this. So let giraffeBark = dog.bark.bind(giraffe) will mean that calling giraffeBark() returns "Geoffrey is barking".
Why is this complicated? When we pass a callback function, we’re not executing that callback. The callback function is run when the function that calls the callback is run. The execution environment is not always what you would expect, which is why this can change.
Day 34
On Friday, we started exploring Node. We’d used the node repl before to experiment with JavaScript from the command line and run simple scripts, but we hadn’t covered much more beyond “okay, now type node into your command line. Okay, you’re good to go!”
We started with a quick overview of the difference between working in Node and working in the browser: both are JavaScript runtime environments. Browsers include APIs for interacting with the DOM; Node includes APIs for interacting with the server and the file system.
From there, we started using the Node file system methods to read from and write to files. We were working with a script that takes two optional command line arguments: the file to read, and the file to write. If the write file isn’t provided, the script writes to /dev/stdout, which was initially described to us as “the terminal/console.log() in node.” If a dash (code>-) is given instead of a file to read, the script reads from stdin. Time for me to have a Capital M Moment with the command line. I kept running variations on this script, like so:
node lib/copy-file.js data/infile.txt outfile.txt This works as expected: the contents of data/infile.txt get copied to outfile.txt)
node lib/copy-file.js data/infile.txt Again, as expected: the contents of data/infile.txt get written to the console (in Node, the Terminal)
node lib/copy-file.js - outfile.txt This is where things got confusing. The dash means I want to read from stdin, which I currently understand as “the Terminal,” which I process as “the command line.” But…where, exactly? I try this:
node lib/copy-file.js - outfile.txt And get nothing—as in, I have to forcibly exit out of node because it’s waiting for an argument it’s never going to get.
node lib/copy-file.js - outfile.txt data/infile.txt Same thing. In this case, “data/infile.txt” is the fifth command line argument, which the script isn’t looking for/expecting.
data/infile.txt node lib/copy-file.js - outfile.txt An error from bash this time: -bash: data/names.txt: Permission denied
At this point, I can’t think of any other permutations, so I raise my hand and ask for clarification and am reminded about pipes, which are used to pass the output of one command to another command as input.
I try data/infile.txt | node lib/copy-file.js - outfile.txt and get another error from bash (this time with more detail):
-bash: data/names.txt: Permission denied
SyntaxError: Unexpected end of input
    at Object.parse (native)
    at /Users/Rebekah/wdi/trainings/node-api/lib/copy-json.js:44:17
    at FSReqWrap.readFileAfterClose [as oncomplete] (fs.js:380:3)
I’m told I have to use cat to read the the contents of data/infile.txt: cat data/infile.txt | node lib/copy-file.js - outfile.txt. It works!
And I am SO CONFUSED.
I know that cat reads files. But I ALSO know that our script takes a file path—not the contents of that file—and then uses node’s fs module to read that file. From where I’m sitting, it looks like we’re reading the file twice.
(Are you ready? Here’s where the Moment happens.)
I’m confused because I don’t understand stdin/stdout. I’m still thinking of them as “the command line” or “the Terminal.” My mental image of what happens when I run cat data/infile.txt | node lib/copy-file.js - outfile.txt is that it’s the same as running node lib/copy-file.js "all the contents of data/infile.txt" outfile.txt.
I was so very wrong.
(I’m obviously still learning this, so guidance on this particularly is welcome in the comments, and I’ll do my best to update with any corrections.)
Stdin is a file handler or a stream, not a floating, headless mass of whatever you gave it. When I type cat data/infile.txt, I’m reading the contents of data/infile.txt into stdout, which the | then picks up and uses as stdin. I’m not sending the contents of data/infile.txt—to my script as the infile argument. It helped me to think about it as copying data/infile.txt to a new pseudo-file called stdout (and then to stdin), and giving “stdin” to my script instead of “data/infile.txt.” The script can then read the contents of stdin in the same way it can read the contents of data/infile.txt.
(This has been A Moment with Bash.)
None of that was actually the point of the lesson, which was to teach us that Node (unlike plain old JS or jQuery) can interact with the file system, which is pretty cool. It also served as a segue for learning about callback hell and Promises, which we talked about after a quick detour:
But we also talked about the importance of getting the job done and of learning how to focus your energy (and on what). Someone also made the point that the PB&J dude has clearly never been in a grocery store before, and a huge part of GA is, effectively, taking us on lots and lots of trips to the grocery store—we might not know every botanical detail about the tomato, but we know that you don’t need a tomato to make a PB&J, so we’re already, like, eight steps ahead of this guy.
(Lost? It’s worth reading the article, and also the original article about learning JS in 2016. I also really like this response from Addy Osmani: “first do it, then do it right, then do it better.”)
Entering the Promised Land
On to promises. When ES6 came out, I remember reading an article on Medium about promises as part of a larger effort to educate myself about JavaScript, generally speaking. At the time, it was over my head—it was one of those articles that you struggle through because you don’t know what most of the code means and can’t yet conceive of a useful situation for this particular feature.
I’m not sure I’m *that* much clearer on Promises now, but I’m getting closer. Here’s my key takeaway so far:
Promises get you out of callback hell: they help you organize asynchronous code in a more linear way, so it’s easier to read and understand.
The rest is mostly details:
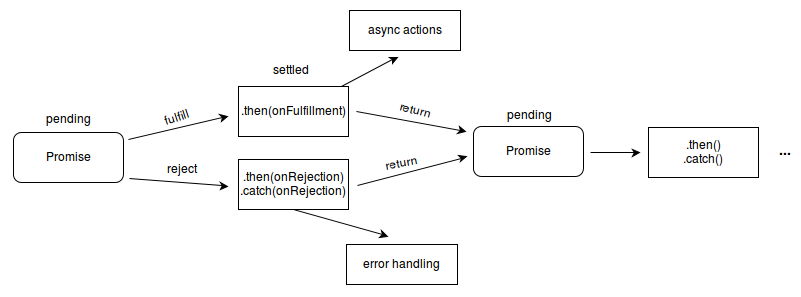
Promises can be pending or settled. Settled promises can be fulfilled or rejected.
Promises can only settle once. When they are settled, they are either fulfilled or rejected, but they can’t switch or resettle.
When you write a promise, the promise’s “executor” takes two functions as arguments: resolve and reject. The executor usually does something asynchronous (read a file, for example), then, when that work is finished, calls either resolve (if it’s successful) or reject (if there’s an error). resolve fulfills the promise and passes whatever data you give it to .then, which takes a callback that executes with that data. reject rejects the promise and passes the error you give it to .catch, which takes a callback that executes with that error.
Both .then and .catch return promises, so you can keep chaining .thens and .catches together.
We spent some time “promisifying” scripts that used callbacks, focusing specifically creating “wrapping functions” in Node to use promises instead of callbacks. The emphasis was on avoiding these common mistakes:
Not returning something from .then (unless the .then statement its the last thing in the chain). If you mess this up, data won’t continue to propagate down the chain.
Not calling resolve and reject in the executor somewhere.
Not handling errors (if you don’t, your promise will fail silently).
Executing a callback (i.e., .this(doStuff(data)).this(doStuff)).
Treating AJAX like a promise. $.ajax() is not a promise.
$.ajax() returns a jqXHR object, not a promise.
As we work more with Node, it sounds like promises are going to be a Big Deal. At the end of last week, they didn’t feel intuitive, but after our homework over the weekend and class yesterday and today, I’m starting to feel a bit better about them. Onward!
Our second project for General Assembly was to build an API using Rails and then build a single-page JavaScript application for interacting with it. We had solid technical instructions, but the content was totally up to us—for me, this is always the hardest part. I love making things, but inventing them isn’t my forte.
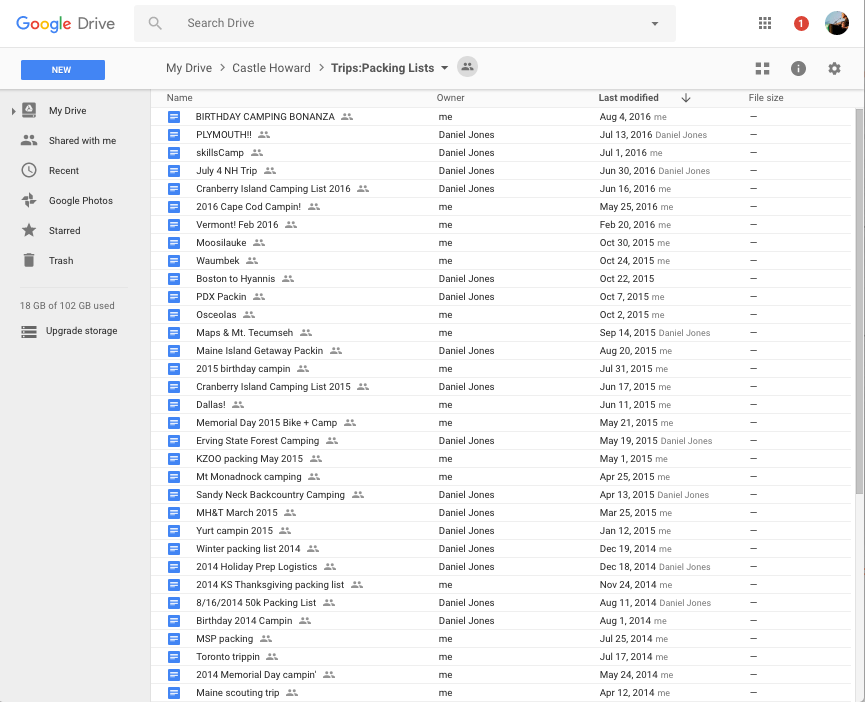
Luckily, I had a problem in need of solving. See this?
Those are packing lists. Dozens of them, and that’s only counting trips I’ve taken with my partner in the past couple of years. I’ve also made lists in Simplenote, scribbled them on the backs of envelopes or the margins of research papers, and—worst—forgotten to make lists and ended up in Toronto without a toothbrush.
It’s not a gigantic problem, but it was enough to spark Go Bag, a packing list app for people like me.
Quick links, in case you want to skip the chatter below and go straight to the code:
During this project, I experimented with keeping a “dev log”—quick notes on what I did each day. It was a good way to track my progress and make note of anything that stumped me/new things I discovered. I kept it in Simplenote, and kept my running to-do list at the bottom, which made it easy to move tasks up into the log one at a time as I worked on them and gave me a space to offload ideas for the future and things I didn’t want to forget (like “double check that that button still works” or “write documentation”). A++ would do again.
9/23
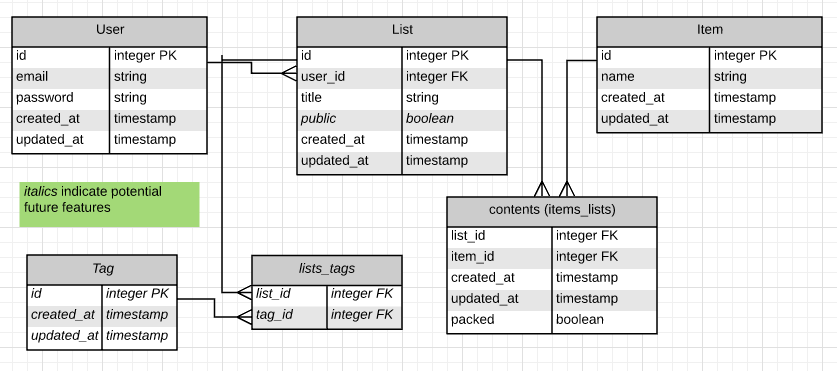
I started by sketching out a data model in LucidChart:
9/26
We were given a template for a Rails API that included a users resource and authentication. Starting there, I used Rails’ scaffolding to generate models / migrations / routes / controllers / serializers for my lists, items, and contents, then set up the relationships among everything.
9/28
On 9/26 and 9/27 we learned about automated testing using RSpec. It was the best. I decided to try to backfill in tests, but I got tripped up with authentication and, in the interest of time, decided to move on.
9/29
This was our first official project day. I spent the day:
Writing and testing curl scripts for every action I wanted to perform with my API.
Protecting lists, items, and contents by having their controller classes inherit from the provided ProtectedController class, which checks to make sure the user is authenticated before providing access to the resources.
Using current_user to make sure users can only access their own packing lists.
Sketching wireframes.
Building out forms and API calls from the front end for authentication, based heavily on my Tic Tac Toe app. I was pretty excited to be able to refactor my log in function(s)— I was previously using two separate log in functions, one to handle “regular” logging in, and one to handle automatic log ins for users who had just signed up. I was able to condense this into a single function, which felt great.
Starting to separate HTML into Handlebars templates. For this project, we were given the same client-side template as we were for the Tic Tac Toe games. One of the more confusing/frustrating pieces of that project was figuring out how and when to hide/show different DOM elements, and how to make sure that what was displaying on the page always matched up with what was on the server. My game appends things on the page and then sends data to the server, which works functionally but also a) is a lot of steps, and b) leaves open the potential for the client and the server to get out of sync. Working with Handlebars made the concept of “re-rendering” click for me—I can grab data, feed in into a template, and replace everything currently on the page or in a specific section with the product of that template. Figuring out how to split things up and making sure I had the appropriate elements in the DOM to target for replacement/re-filling was a bit tricky, but once I got the hang of it, I felt like I could work more smoothly and cleanly.
9/30
Kept working with Handlebars.
Signed up for a Heroku account and deployed my API. It took me a while to figure out that my global ~/.gitignore file had been set (as part of GA’s Installfest) to ignore all secrets.yml files, which hold the environment variables for secret keys. (I had even checked ~/.gitignore_global, which is the sample file name GitHub uses when talking about global gitignore files, but hadn’t looked inside of ~/.gitignore. Oops.) This caused issues trying to set secret keys on Heroku, and a friend and I spent a significant chunk of the morning working through this. I ended up forcibly adding the file to my repo, which felt scary and bad (but worked!), before one of the instructors jumped in and explained the ~/.gitignore issue.
After that, I went back to Handlebars and discovered the hard way that you can’t register event handlers to DOM elements that aren’t on the page when it initially loads. Whoops! I went back and fixed that by registering events on elements that *do* exist, then moved on to building functionality that allows authenticated users to create lists and add items to a list.
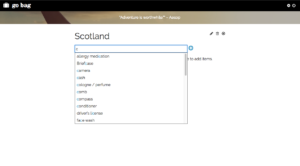
One of the pieces of flair I really wanted for this app was the ability to type a potential packing list item—say, a toothbrush—into an input field and have an autocompleted list of potential items to choose from pop up. This felt like smoother UX than checking off items from a super long list on a page, and it tied in with my desire to avoid having a different toothbrush in the database for each user.
I decided to use the Devbridge jQuery-autocomplete library for this. I spent the rest of the day getting this to work, with a couple of challenges/steps:
I needed to implement search functionality in my API for autocomplete to work.
Despite the fact that the library claims to allow you to pass in headers, I saw multiple issues filed on the repo from people who couldn’t successfully pass an auth token through in their API call. I couldn’t get this to work either, so I ended up unprotected the index/show methods for my items controller in order to get autocomplete to work.
The library makes the API call for you, but it sends back a JSON string instead of a JavaScript object. It took me more time that I want to admit to realize this. Pro tip: are your property keys surrounded by quotation marks when they’re normally not? You’re probably working with JSON!
The library wants your potential autocomplete suggestion data to be formatted in a very specific way, so I needed to write a function to transform the data coming back from my API.
Towards the end of the day, I had a fully functional autocompleting input field. Typing in “to” would offer “toothbrush” and “toothpaste” and “Tootsie rolls” (assuming all three of these existed in the items table already) as possible options. Success! From my perspective, this is the coolest part of my project. It feels polished in a way that not much else I’ve built yet does, and it adds functionality—it helps suggest things to users that they might forget and offers a tiny bit of serendipity (typing in “s” to get to “sweater” will give you a list of options that includes “swimsuit,” which might help you make use of the hotel pool in Boston in February). It also, I think, looks nice.
Restraining myself from using hyperbole and exclamation points in my commit messages but in my heart they mostly read “DID MAGIC!!!!!"
I was feeling pretty impressed with myself, but that balloon popped almost immediately when I realized I hadn’t thought carefully enough through the UX workflow to know how to build the next piece, where choosing an item from that pool of suggestions lets a user add it to a list, and typing in something that’s not in the pool of suggestions creates a new item and then adds it to the list. I spent a few minutes hashing this out, referencing Avocado (a list-making app for pairs of people) heavily in the process. At the end, I had this:
form will have a hidden input element for the list id
enter an item, save
after saving, display another item input field so the user can add another item
focus first on items that exist in db
figure out later how to add a new item using same UI (ultimately decided: if item exists already, save a “contents” association between the list and the item. If it doesn’t, first save the item, then save the contents association)
That gave me enough to work on starting on Saturday morning.
10/1
I got single item addition working, then moved on to letting users add multiple items in succession. This involved redrawing the list after saving the item, which meant going back to my serializers to make sure I was passing sufficient data through in order to be able to access a list’s title and id plus all of its items’ ids and names. I also added some validation to the Contents model so that a list can’t contain more than one of the same item.
After this, I realized that I hadn’t done enough testing after splitting up my HTML into different templates, and I had broken more of my click handlers than I realized, particularly around authentication. Bug fixing time!
Since I was working with authentication anyway, I decided to build user profile functionality, where logging in gets a user’s email and lists and renders the user’s list titles (including links that let the user edit each list individually) on the page. This gave me some code I could reuse when switching to and from different views/states while authenticated, which was an added bonus.
I fixed some more click handlers, played around with the default order of lists and items coming back from Rails, and fixed a bug that was popping up when a user tried to add an item (say, “toothbrush holder”) that starts with the name of another item (“toothbrush”). This turned out to be fairly simply, and involved using an option that comes with the jQuery-autocomplete library that is activated when you “invalidate” input (in other words, when you keep typing after already filling the input with a valid option from the list of suggestions).
10/2
I started Sunday with lots of deleting: items from lists, and lists from a user’s account. I decided not to offer item delete functionality through the client—I didn’t set up my data model in such a way that the items a user adds are associated only with their accounts, and I didn’t want users to delete items that would then be (surprise!) removed from other users’ lists. This was a deliberate decision, as I wanted the things a user adds to their list that I haven’t, as the maker of the app, already thought of to be available to other users. For example: if I seed the items table with “insect repellant” but someone else adds “bug spray” to their list, I want other users to be able to find and add “bug spray” as well. There seemed to me to be enough value in that collectively generated set of items that I didn’t want to hide it from users.
There are cons to this approach that I haven’t quite figured out yet. The first is privacy. If you add “Helga’s Wellbutrin” or “surprise birthday present for Alistair,” those items are available for everyone to see, which is a bad thing. The second relates to usefulness: as Fran, I don’t care about or want my options cluttered with Helga and Alistair’s stuff. When I was presenting Go Bag, I talked a bit about this, and I think my next step is to enable a seeded list of items available to all users, but confine new items to specific users’ accounts. Each user will be able to see the seed list plus the items they’ve added, but not the items anyone else has added. Another step past this would be to let users suggest new items for the seed list, and create an admin account with the power to approve/deny these requests. “Bug spray” would get added, but “lolBUTTS” would be visible only to troll1997@butts.butts.
After building the client-side deletion features, I added a checkbox to mark an item within a list as “packed” and updated the API to send back items in a list ordered first by unpacked vs packed, and then, within those groups, with the most recently updated items first. Given that I’m re-rendering the contents of a list each time they change, this means that clicking the checkbox next to an item to pack it will move it toward the bottom of the list, to the top of the section of packed items. Unchecking it will move it back to the top of the list. Since I’m getting all list items (“contents” in my data model) through the lists serializer, I realized I don’t need dedicated index or show methods for contents, so I removed those from the ContentsController class.
At this point, I decided to get what I had up on GitHub pages and make sure it worked with my deployed API. After I set the CLIENT_ORIGIN on my deployed API to my GitHub pages URL, everything worked as expected.
I moved back to the client side of things and moved error messages out of console.log() statements and into the UI. I also added some lightweight validation on lists, so that a user can’t have two lists with the same title.
At this point, I felt like I had all of the client-side functionality that I absolutely needed in order to submit a working project. This freed me up to start working on design, which I both like (shiny things!) and find trying: inventing a design from scratch while simultaneously writing HTML/CSS feels a bit like building the airplane while it’s already in the air. I could solve this problem by putting together better, full-fledged mock-ups with art and typography, but a) that’s not practical on the timeline we have for GA projects, and b) I’m still mourning my loss of access to the Adobe Creative Suite, and I haven’t yet bothered to acquire/teach myself replacement software.
I spent the next few hours working with Handlebars templates, SCSS, stock photography, and Google fonts. I took a few small breaks to build tiny bits of actual functionality: for example, ensuring that clicking on the app’s logo in the upper left would load the default home page for visitors but the correct user’s profile for authenticated users.
Once I had the home page and authentication forms looking mostly how I wanted them to look, I gave myself a reward and built a list title editing feature (in case your New Hampshire camping trip gets rained out and you end up going to the Catskills instead) and—this was super cool—the ability to clone lists. I find myself duplicating my lists in Google docs all the time so that I can tweak an existing list for a new trip instead of starting with a blank slate. In Rails, I used the deep_cloneable gem to clone a record (list) with its associations (contents/items). I didn’t have to write much code for this, but it felt like absolute magic. A couple of tips:
Cloning uses a POST request, which expects data. All the data you need is already in the database (which is why you’re cloning in the first place), so you can send an empty data object along with your request to fix the HTTP/1.1 411 Length Required error.
I had set up validation so that lists can’t have the same title. To make sure the cloned record validates, I had to edit the title before saving—I prepended “copy of” so that it would be clear to users what had happened.
At this point, it was Sunday evening, and rather than jumping into building new stuff, I decided to work on documentation for my API. I had Willow’s tweet in my head while I was typing:
Be the adult you wish you had around when you were a child.
Write the documentation you wish you had when you started on this project.
I know not everyone gets as excited as I do about rules and guidelines, but to me, this is a thing of beauty.
10/3
On Monday, I went back to styling. Such SCSS. So typing. Cool things I learned:
You can use word-wrap: break-word; to break up a really long string of characters (say, an email address like rebekahheacockjones@gmail.com?) so it doesn’t, for example, run off the screen on mobile.
It’s frustrating to work with Handlebars templates + CSS + JS. Moving things around in Handlebars will (inevitably, again) break your functionality, and relying on the same classes for styling and functionality is starting to feel more and more precarious. I’m curious about best practices here—I know at least one company that has separate classes for CSS-related things and for JS-related things, which makes your markup a bit longer/clunkier but sounds kind of attractive at this point.
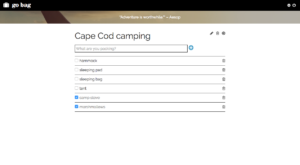
I grumble about this, but I’m pretty happy with the way the UI turned out:
Desktop
Go Bag
About Go Bag
Go Bag: log in
Add a list
Lists
Add an item using autocomplete
Single list
Mobile
Go Bag (mobile)
Go Bag: about (mobile)
Go Bag: log in (mobile)
Lists (mobile)
Edit a list title (mobile)
Single list view (mobile)
I spent the rest of the day writing up documentation for the front-end repo (a shorter version of this, plus Agile user stories, wireframes, and a list of dependencies), putting together a seed list of items, and tweaking my API documentation.
10/4
Last project day! I spend the morning cleaning up (taking out console.log() statements; organizing and refactoring to the best of my ability) and adding a few extra touches: a favicon, a “loading” icon that replaces the “Sign Up” and “Log In” button text while the form is processing, and adding smooth internal scrolling when you click the “learn more” link on the home page.
I sent the app to a few friends and family for “beta testing,” and my sister discovered a bug when clicking the home button immediately after adding a new list—I needed to re-fetch the user profile data before re-rendering the profile view. (Thanks, Katie!)
At this point, I had half a day left, so I decided to venture back into RSpec. I started by reading through a bunch of articles on testing Rails APIs with Rspec. Many of them recommended using two additional tools, both from Thoughtbot: Shoulda Matchers and Factory Girl.
I was writing tests for one of my models, and I already had set up / tear down steps written to create and delete instances of that model for testing, so I decided to skip Factory Girl for now and experiment with Shoulda.
After this, I ran into an issue with authentication inside of a test that I still haven’t figured out (hoping to work one-on-one with an instructor soon, as even after some back-and-forth and trying out multiple methods of handling authentication tokens within the test, I’m still getting an “HTTP Token: Access denied” error). It didn’t put me off of automated testing, though—I’m determined to get this working. The first “real” CS course I ever took was CS50, and our first problem set included tests for the C programs we were writing. Seeing those green smiley faces was SO. COOL. I want my code to do that—to not only work the way I expect it to work, but to self-verify that it works the way I expect it to work, and to do that in a way that communicates clearly to other people who work on the same code what should happen and what, if anything, is broken.
10/5
Presentation day! Once again, the random presentation order put me at the end, which gave me all morning and all of lunch to be nervous.
I used the same tactic I used last time, of pulling up a bunch of tabs with things I wanted to make sure I talked about. I overdid it a bit because I wasn’t sure how long each thing would take, so I only made it through half of the things on my list before the timer beeped, and I felt like I was rushing things and not actually making the points I wanted to make. Overall, though, it went okay—I got some good questions about my approach to testing (all the curl scripts, plus some general sadness about not working with RSpec as much as I wanted to) and—I was kind of surprised by this!—people seemed really interested in how I implemented the random travel quote that’s displayed at the top of the page when you log in. (It’s an array of strings; I pick a random one and send it to the Handlebars template each time the profile is rendered.)
I wrote a lot of SQL scripts today, mostly focused on joins. A few things I learned:
You have to use double quotes around names for things (databases, tables, columns) within SQL, but single quotes around strings. Mnemonic: “[S]ingle quote for [S]trings, [D]ouble quote for things in the [D]atabase.” The command line doesn’t care about quotes, so you don’t need to be as specific in psql commands.
A new convention for naming join tables: use semantic names, e.g., “loans” for a join table between books and borrowers or “amounts” for ingredients and recipes (assuming you’re specifying things like “1 cup of flour” in that table). This is a change from how I’ve previously done things, where I’ve used the combined names of the two tables, in alphabetical order, separated by an underscore (“books_borrowers” or “ingredients_recipes”).
Objects in a database are not just tables. Objects can also be sequences or indices (and maybe other things I don’t know yet).
VARCHAR is part of SQL standard; TEXT is not. But Postgres gives us TEXT, which is “efficient/optimized”—I think this means efficient in terms of being easier to write when you’re coding, but I’m not sure.
\i in psql reads a script file into buffer and sends it to database server. Rails migrations also do this: they generate SQL commands based on code in migration.
psql offers basic logic capabilities You can use bash loops to batch execute psql scripts (thanks for the correction, Jeff!): for i in scripts/cookbook/*; do psql -f $i sql-crud; done
UNION in SQL will joins select statements together.
A foreign key reference is a constraint: limits what can happen; disallows certain actions.
SQL doesn’t execute in order: either the whole statement is valid & executes, or nothing executes. This lets you define things (like aliases) after you use them. The parser parses the entire statement & figures out the details for you.
Not relevant to SQL necessarily, but cool: typing cal into the command line will give you a monthly calendar.
We also talked about how to implement many-to-many relationships in Rails. Scaffolding or creating migrations will set up *part* of the relationship, but you still have to edit your models to specify has_many or has_many through relationships. You also have to add inverse_of in a join table, telling the join table to be the inverse of itself. This sparked significant confusion in the class, and I’m still not clear on what this is, how it works, and why/where it’s needed.
Day 26
We continued working with data relationships in Rails.
We also talked briefly about protecting resources in our Rails API by having our controllers inherit from the ProtectedController class, rather than the ApplicationController. Not clear whether this is a standard feature in Rails, or something that GA built for us.
Behavior-Driven Development (BDD)
This unit was one of my favorites so far: behavior-driven development using RSpec. The approach we took was:
Write a user story/define a user behavior.
Write a feature test that targets this behavior.
Run the feature test. Watch it fail.
Write a unit test.
Run the unit test. Watch it fail.
Write code to satisfy the unit test.
Run the unit test. Watch it pass.
Go back to steps 3-7 and repeat until your feature test passes.
Commit your code.
Day 27
We kept rolling with BDD today. We talked about four-phase testing: (not all four steps happen for each test)
setup (a lot of this happens in before(:all) and before(:each); also parsing JSON, etc.)
act/exercise (actually execute the code the test is acting upon, e.g., Article.create)
assert (expector should)
teardown (after(:all))
My feelings about TDD/BDD can be described as:
I understand why we learned about Rails before we learned about RSpec, but I’m sad that I got a head start on my second project and set up all of my resources and THEN learned about automated testing. I’m hoping to be able to use BDD/TDD for another project, but in the meantime, I’m trying to go back and write automated tests for the code I’ve already written. More on this when I write up my project (soon, I hope!).
A few more things about testing and RSpec and Rails:
Rspec uses TEST (not DEVELOPMENT) environment (test database, not dev database).
Code within feature tests will by nature replicate code within unit tests. Feature tests are “black box” tests; they “don’t exist within Rails.” Unit tests (controllers, models, routing) exist within Rails and have access to things. Feature tests are like curl requests. Feature tests spin up a server—this takes a long time/is expensive. (This was a quick explanation to a question I asked about why we’re replicating so many lines of code between our feature tests and unit tests—why can’t we just call a unit test we’ve already defined from within a feature test? I need to come back to this; I still don’t fully understand the separation/redundancy here.)
All hashes that come through Rails are called “hashes with indifferent access” and will work with symbols or strings. JSON.parse returns a Ruby hash, meaning we can’t use symbols to access attributes.
Use more specific, less semantic tests in unit tests (and more semantic, “friendly” language in feature tests). Example: .to be_successful in feature test vs .to eq(200) in unit test.
Handlebars
We took a very quick spin through Handlebars, a rendering library (templating engine) for JavaScript. For me, this filled in some of the gaps we left by not using views in Rails/using Rails only as an API. We’re using handlebars-loader to load/process Handlebars files for us.
Days 28-29
Thus began project 2. I’m planning to write this up in a separate post, so that wraps things up for this week!
In Part 1, I talk about facing my fears of potential machine ruin and beginning to figure out what, exactly, is happening in my bash init files. At the end of that post, I had just figured out that three lines of code in my ~/.bash_profile file were checking to see if I had a ~/.bashrc file, and executing it if so. Now that I know that, I can start digging into what this code actually does. Since I’m already hanging out in ~/.bash_profile, might as well start there.
Step Three: Take apart .bash_profile
Line 1
export PATH=/usr/local/bin:$PATH
PATH is something that comes up a LOT when you’re setting up different coding-related tools. I knew it had something to do with finding the right versions of executable code (including programming languages like Ruby or PHP). The Wikipedia article on $PATH explains: “When a command name is specified by the user or an exec call is made from a program, the system searches through $PATH, examining each directory from left to right in the list, looking for a filename that matches the command name.” Adding specific paths to your $PATH variable makes sure you’re using the versions of code that you want to be using.
Old Unix machines originally looked in /bin for executable files. Later versions of Unix added /usr/bin (and then /usr/local/bin) because /bin grew too large to be efficient.
Moving on: we’re setting PATH (the variable) to /usr/local/bin:$PATH. It looks like paths within PATH are separated by colons. $PATHechoes out the current value of PATH. To sum up: we’re adding /usr/local/bin to the beginning of the PATH variable.
Sweet. Now we know what this is doing!
Next question: why?
Wikipedia says the default PATH includes /usr/bin and /usr/local/bin. So why add /usr/local/bin again?2
I don’t know the answer for this right now, so I’m going to move on.
Line 2
test -f ~/.bashrc && source ~/.bashrc
This looks suspiciously similar to lines 6-8, which I talk about in Part 1.
test is a builtin Bash command that “tests file types and compares strings.” In Part 1, I learned the -f flag returns true if the file exists and is a “regular” file, i.e., not a directory or a file that’s actually a physical device like (I think?) a USB key or an external hard drive. && is a way of chaining commands together where the second command executes if the first command returns true. From the googling I did last time, I know source ~/.bashrc looks for the ~/.bashrc file and executes it.
To sum up: this is doing the exact same thing as lines 6-8. Fun fact: that welcome message that was showing up twice every time I opened a new tab in Terminal? THIS IS WHY. Leaving this line in and removing lines 6-8 solved that problem.3
Adding more things to my PATH! This one adds the path to my copy of Sublime Text, which is the text editor I for anything where I’m looking at more than a single file at once. Adding it to my path enables me to use the subl command line tool. I don’t know if this is in the right place,4 but I know that temporarily commenting it out makes attempting to run subl in Terminal give me a “command not found” error, so for now, it’s staying.
Line 10
eval "$(rbenv init -)"
Last line! According to this Stack Overflow post, eval takes a string and evaluates it as if you’d typed it into the command line. Wrapping something in $(…) runs it in a subshell (see 1 again).
That leaves us with rbenv init -. rbenv is a Ruby version management tool that we’re using as part of General Assembly. I installed this as part of our “Installfest,” a day where we type a bunch of commands into Terminal and paste a bunch of code into our bash init files, and I haven’t done any research on how it works. According to the docs, it uses a trick in the PATH variable that lets us specify, at a project-by-project level, a specific version of Ruby to use rather than always using the default version on our system.5
The docs also talk about rbenv init. That section starts with “Skip this section unless you must know what every line in your shell profile is doing,” which means I’m definitely going to read it for the purposes of this adventure. My understanding is that rbenv init: 1) makes the PATH magic happen by adding ~/.rbenv/shims to the beginning of my PATH (which I think only needs to happen/only happens once?); 2) “installs autocompletion” (for what? no idea6); 3) rehashes the shims (makes sure that rbenv knows where different Ruby versions are and can direct commands like rake and pry appropriately); and 4) gives rbenv the power to “change variables in your current shell.” Back to my question about shells.1
At the end of the docs, they say “Run rbenv init - for yourself to see exactly what happens under the hood.” This is the output:
~ $ rbenv init –
export PATH=”/usr/local/var/rbenv/shims:${PATH}”
export RBENV_SHELL=bash
source ‘/usr/local/Cellar/rbenv/1.0.0/libexec/../completions/rbenv.bash’
command rbenv rehash 2>/dev/null
rbenv() {
local command
command=”$1″
if [ “$#” -gt 0 ]; then
shift
fi case “$command” in
rehash|shell)
eval “$(rbenv “sh-$command” “$@”)”;;
*)
command rbenv “$command” “$@”;;
esac
}
Right. As far as I can tell, this is updating my PATH, setting the RBENV_SHELL to bash, then running whatever exists at /usr/local/Cellar/rbenv/1.0.0/libexec/../completions/rbenv.bash. The rest is doing the rehashing bit, I gather—I’ll dig more deeply into this another day, I think. Okay!
Side note: this line used to be in my ~/.bashrc file. I was having trouble getting my Ruby linter to work in Sublime, and then I found out that it needs to be in ~/.bash_profile (long PDF; the relevant part is on page 49 of the file/page 43 according to the printed page numbers). I moved it, and rubocop is working again, so I’m happy with that for now.
Wrapping Up
Okay! That’s one file down. I deleted three lines and got rid of that pesky repeated welcome message, so that’s good. I also have a ton of questions (do you know about these things? are you willing to help out a well-intentioned and somewhat confused newbie?).
A friend commented on my last post to recommend, among other things, an O’Reilly book on learning the bash shell. (Huge thanks to him and to everyone else who’s given advice/helped answer questions so far!) Since then, I’ve heard from several other people that getting comfortable with the command line is one of the best things I can do to make myself a better, more fluent engineer. That advice plus this process plus the recent Twitter kerfluffle around this HackerNoon article about JavaScript tool/framework proliferation (and in particular, this excellent thread by Safia Abdalla about what things are actually important for engineers to learn)—all of this has reinforced my desire to be able to be willing to open up the hood, ask questions, and understand what’s going on behind the code/scenes.
I’m mixing my metaphors, but the point is: I’m having fun, and I can’t wait to write up what I’ve learned about my ~/.bashrc file in Part 3, coming soon!
Notes and Questions
Do you know the answer to any of these? Are you willing to share? Please do! Comments/emails/tweets all welcome!
1. Still not 100% clear on when to use/not to use export, or what “subprocesses” and “subshells” mean in this context. When I open Terminal on my Mac, I think that I’m entering (running? using?) the bash shell. From there, I’m not sure what a subshell would be. A subprocess could potentially be something within my shell, like irb or pry or node.
2. I’m using a 2010 MacBook Pro, running OS 10.11.6 (El Capitan). Do I need this line, and if so, is it in the right place? Relatedly: is there a way to find out what the “default” PATH is, sans any changes made by the user in any of their bash init files? Predictably, echoing out my entire PATH gives me a giant mess (removed the colons and separated this into lines for better readability):
3. Does anyone know what the exact differences between line 2 and lines 6-8 are, other than syntax, if any? I chose to leave in the shortest/most compact version (test), but I’d be curious to know if there’s a best practice or preferred standard around when to use test vs if statements.
4. While we’re on best practices: is there a best practice for where to put any necessary export PATH statements, and/or in what order?